Create a MSI Setup with WiX Tools V3
The WiX (Windows Installer XML) tool set is used to build MSI packages for your software. You can add a wixproj besides your main C# projects and define what you want to be installed, where you want it and even if you want to create shortcuts for your software. The generated MSI package can be built in an automated process, like the DevOps CI build pipe.
Getting started
Install the tools
Download the Toolkit on GitHub Releases. The tool set is already installed for the Windows-latest Azure Container images for your CI build pipe on DevOps.
optional VS extensions You can also install the VS extensions WiX v3 VS Studio Extension and the Wax Extension.
Create a Project
Create a new project with the MSI setup template in your existing solution. This will create a project with a wsx file. This file describes the setup process, the components and all the rest to create a good MSI package.
WiX has its own ‘compiler’ and ‘linker’ called candle.exe and light.exe. You could interact with them per CLI, but you can also just use your VS and the default build tasks in your CI build pipe to create the MSI setup file.
wxs file and content
The MSI package contains so called features. These contain Component Groups, the groups contain Components and all of this can be separated in Fragments.
If you activate and use UI dialogs, you can let the user decide if features should be installed or not (not explained here yet).
Project references
Add the project references to the necessary source project, of which you want to deliver the output with your setup. This can be done either by the WAX VS Extension, by the usual way with a right-click on the reference node in the project, or by manipulating the project file itself.
Setup Project content
The wsx file contains the Product information with an GUID ids for the setup. Some can be autogenerated with an asterisk *. The Name attribute contains the Product Name of your software. The Manufacturer won’t change very often, so it can be hardcoded. The UpgradeCode is a fixed GUID to be set for each setup. It identifies the product for the OS to know this exact product and must stay the same for each new version. The OS compares this and the version number to decide if the product install process is an upgrade or to prevent downgrades of the software.
Variable definitions
The needed variables are defined on top of the Product.wxs file to improve the maintenance.
1
2
3
4
5
6
7
8
<!-- define dynamic variables here -->
<?define ProductManufacturer="Hermann Otto GmbH" ?>
<?define PackageDescription="WiX Installer EDU Project" ?>
<?define ProductTargetExe="WixInstallerEDU.exe" ?>
<?define ProductVersion="!(bind.FileVersion.MainExeFile)" ?>
<?define ProductTargetDir=$(var.WixInstallerEDU.TargetDir) ?>
<?define ProductProjectIconDir=$(var.WixInstallerEDU.ProjectDir) ?>
<?define ProductHelpLink=https://dev.azure.com/OttoChemie/Ausbildung/_git/WixInstallerEDU?>
The next part is to determine for which environment the setup should be built. This gets controlled via Environment variable SETUP_ENVIRONMENT, either a local one on the developer machine, or the one set in the CI build Pipe in DevOps. The CI env variable can be set within the CI pipe as shown in my other articles. To set a local env var on you dev machine you can use [System.Environment]::SetEnvironmentVariable('SETUP_ENVIRONMENT','DEVELOPMENT',[System.EnvironmentVariableTarget]::User) (Note: This is case sensitive).
This part sets the dynamic values to build the single setup project upgradable for each environment and customizes it with icons and shortcuts:
1
2
3
4
5
6
7
8
9
10
11
12
13
14
15
16
17
18
19
20
21
22
23
24
25
26
<!-- set environment dependent values -->
<?ifdef env.SETUP_ENVIRONMENT?>
<!-- DEVELOPMENT -->
<?if $(env.SETUP_ENVIRONMENT)=DEVELOPMENT?>
<?define ProductName="WixInstallerEDU.DEVELOPMENT" ?>
<?define ShortcutName="WixInstallerEDU - DEVELOPMENT" ?>
<?define UpgradeCodeGUID="{9682658F-AD3E-414E-BD27-228B3B2B37DD}" ?>
<?define ApplicationShortcutGUID="{01E478D8-A4FE-4138-B945-6030B774B6BE}" ?>
<?define DesktopShortcutGUID="{D8F54CD5-8267-4137-8147-7CF706B141F4}" ?>
<?endif?>
<!-- BETA -->
<?if $(env.SETUP_ENVIRONMENT)=BETA?>
<?define ProductName="WixInstallerEDU.BETA" ?>
<?define ShortcutName="WixInstallerEDU - BETA" ?>
<?define UpgradeCodeGUID="{1DBABF4D-4263-4711-A909-561A949F0F75}" ?>
<?define ApplicationShortcutGUID="{079DE843-1B8C-49F6-8DF7-63E0EE873FF7}" ?>
<?define DesktopShortcutGUID="{F1D19ABD-4454-46C1-9A4B-B95A75B9DD87}" ?>
<?endif?>
<?else?>
<!-- PRODUCTION -->
<?define ProductName="WixInstallerEDU" ?>
<?define ShortcutName="WixInstallerEDU" ?>
<?define UpgradeCodeGUID="{16F1754E-C22F-4266-81FD-EBB841911566}" ?>
<?define ApplicationShortcutGUID="{DD9E215A-0BE0-4E63-A02F-48F0D196A474}" ?>
<?define DesktopShortcutGUID="{101DFDA8-1EAC-4718-B9C4-7B1EE0022323}" ?>
<?endif?>
This uses the preprocessor checks of the WiX tool set: WiX preprocessor Docu
You need fixed GUIDs for the UpgradeCode and the shortcuts resources, to properly install and uninstall independently. The Product ID and the Package Id have to be auto generated with an asterisk *, to be able to change if the version increases and an upgrade install has to be done. Only the UpgradeCode must be fixed for the Windows Installer to recognize the installed product.
Pack the MSI to single file
The MSI would have a cab archive file per default, but with the <MediaTemplate EmbedCab="yes" /> setting the cab archive will be built within the MSI package to only have a single output file.
AppIcon and links
If you have an icon file for you application, you can add it to be displayed in the OS “Programs and Features” dialog. The setup can also contain help links for further information ($(var.ProductHelpLink) is defined on the top of the file):
1
2
3
4
5
6
7
8
9
10
11
12
13
14
15
16
17
18
19
20
<!-- Conditional Block checking if env var exists and if it has specific value for changing the Shortcut name -->
<!-- This only sets a icon for the programmed application UI, not for the shortcut or the start menu -->
<?ifdef env.SETUP_ENVIRONMENT?>
<?if $(env.SETUP_ENVIRONMENT)=DEVELOPMENT?>
<Icon Id="AppIcon" SourceFile="$(var.ProductProjectIconDir)Resources\Dev.ico" />
<Property Id="ARPPRODUCTICON" Value="AppIcon" />
<?endif?>
<?if $(env.SETUP_ENVIRONMENT)=BETA?>
<Icon Id="AppIcon" SourceFile="$(var.ProductProjectIconDir)Resources\Beta.ico" />
<Property Id="ARPPRODUCTICON" Value="AppIcon" />
<?endif?>
<?else?>
<Icon Id="AppIcon" SourceFile="$(var.ProductProjectIconDir)Resources\Prod.ico" />
<Property Id="ARPPRODUCTICON" Value="AppIcon" />
<?endif?>

<!-- Provide information links to be displayed in "Programs and Features" -->
<Property Id="ARPURLINFOABOUT"  Value="$(var.ProductHelpLink)" />
<Property Id="ARPHELPLINK"      Value="$(var.ProductHelpLink)" />
<Property Id="ARPURLUPDATEINFO" Value="$(var.ProductHelpLink)" />
Directories and Shortcut placement
The next part defines the directories where you want to install your software. A good practice is to use the WiX shortcuts to ensure language independent paths, as well as a manufacturer folder and a product named folder. You can also set a shortcut for the start menu folder and a desktop icon:
1
2
3
4
5
6
7
8
9
10
11
12
13
14
15
16
17
18
19
20
21
22
23
24
25
26
27
28
29
30
31
32
33
34
35
36
37
38
39
40
41
42
43
44
45
46
47
48
49
50
51
52
53
54
55
56
57
58
59
60
61
62
63
64
65
66
67
<!-- Directories -->
<Fragment>
	<Directory Id="TARGETDIR" Name="SourceDir">
		<!-- Program Files Folder -->
		<!-- use this ID and Package attribute Platform="x64" to use the 64 bit folder instead of (x86)  -->
		<!-- https://stackoverflow.com/questions/5479790/wix-how-to-override-c-program-files-x86-on-x64-machine-in-wixui-advanced-s -->
		<Directory Id="ProgramFiles64Folder">
			<Directory Id="MANUFACTURERFOLDER" Name="!(bind.property.Manufacturer)">
				<Directory Id="INSTALLFOLDER" Name="!(bind.property.ProductName)" />
			</Directory>
		</Directory>
		<!-- Start Menu Folder -->
		<Directory Id="ProgramMenuFolder">
			<Directory Id="ApplicationProgramsFolder" Name="!(bind.property.ProductName)" />
		</Directory>
		<!-- Desktop Shortcut -->
		<Directory Id="DesktopFolder" Name="Desktop" />
	</Directory>
</Fragment>

<!-- Provide application and uninstall shortcuts in the start menu -->
<Fragment>
	<ComponentGroup Id="ApplicationShortcuts">
		<Component Id="ApplicationShortcuts"
					Guid="$(var.ApplicationShortcutGUID)"
					Directory="ApplicationProgramsFolder">
			<Shortcut Id="ApplicationShortcut"
						Name="$(var.ShortcutName)"
						Description="Starts $(var.ShortcutName)"
						Target="[INSTALLFOLDER]$(var.ProductTargetExe)"
						WorkingDirectory="INSTALLFOLDER" />
			<Shortcut Id="UninstallShortcut"
						Name="Uninstall !(bind.property.ProductName)"
						Description="Uninstalls !(bind.property.ProductName)"
						Target="[System64Folder]msiexec.exe"
						Arguments="/x [ProductCode]" />
			<RegistryValue Root="HKCU"
							Key="Software\!(bind.property.Manufacturer)\!(bind.property.ProductName)"
							Name="ApplicationShortcutsInstalled"
							Type="integer"
							Value="1"
							KeyPath="yes" />
			<RemoveFolder Id="ApplicationProgramsFolder" On="uninstall" />
		</Component>
	</ComponentGroup>
</Fragment>

<!-- Create a Desktop Shortcut -->
<Fragment>
	<ComponentGroup Id="ApplicationDesktopShortcut">
		<Component Id="ApplicationDesktopShortcut"
					Guid="$(var.DesktopShortcutGUID)"
					Directory="DesktopFolder">
			<Shortcut Id="ApplicationDesktopShortcut"
						Name="$(var.ShortcutName)"
						Description="$(var.ShortcutName)"
						Target="[INSTALLFOLDER]$(var.ProductTargetExe)"
						WorkingDirectory="INSTALLFOLDER" />
			<RegistryValue Root="HKCU"
							Key="Software\!(bind.property.Manufacturer)\!(bind.property.ProductName)"
							Name="ApplicationDesktopShortcutInstalled"
							Type="integer"
							Value="1"
							KeyPath="yes" />
		</Component>
	</ComponentGroup>
</Fragment>
The registry entries ensure to have the KeyPath="yes" attribute, which are used to check if these resources are installed or not. The KeyPath attribute check is used by the installer for repair commands or updates of your software. The Shortcut and link resources have to be environment dependent with separated GUIDs to be installed and uninstalled side-by-side.
Components, manually added with Wax extension (not recommended)
The components are the payloads of your installation. These contain the files to deploy. It is a good practice to have a component for each file and each component needs a unique GUID to be identified. Here you can use the WAX VS extension to help you generate most of the needed files entires:
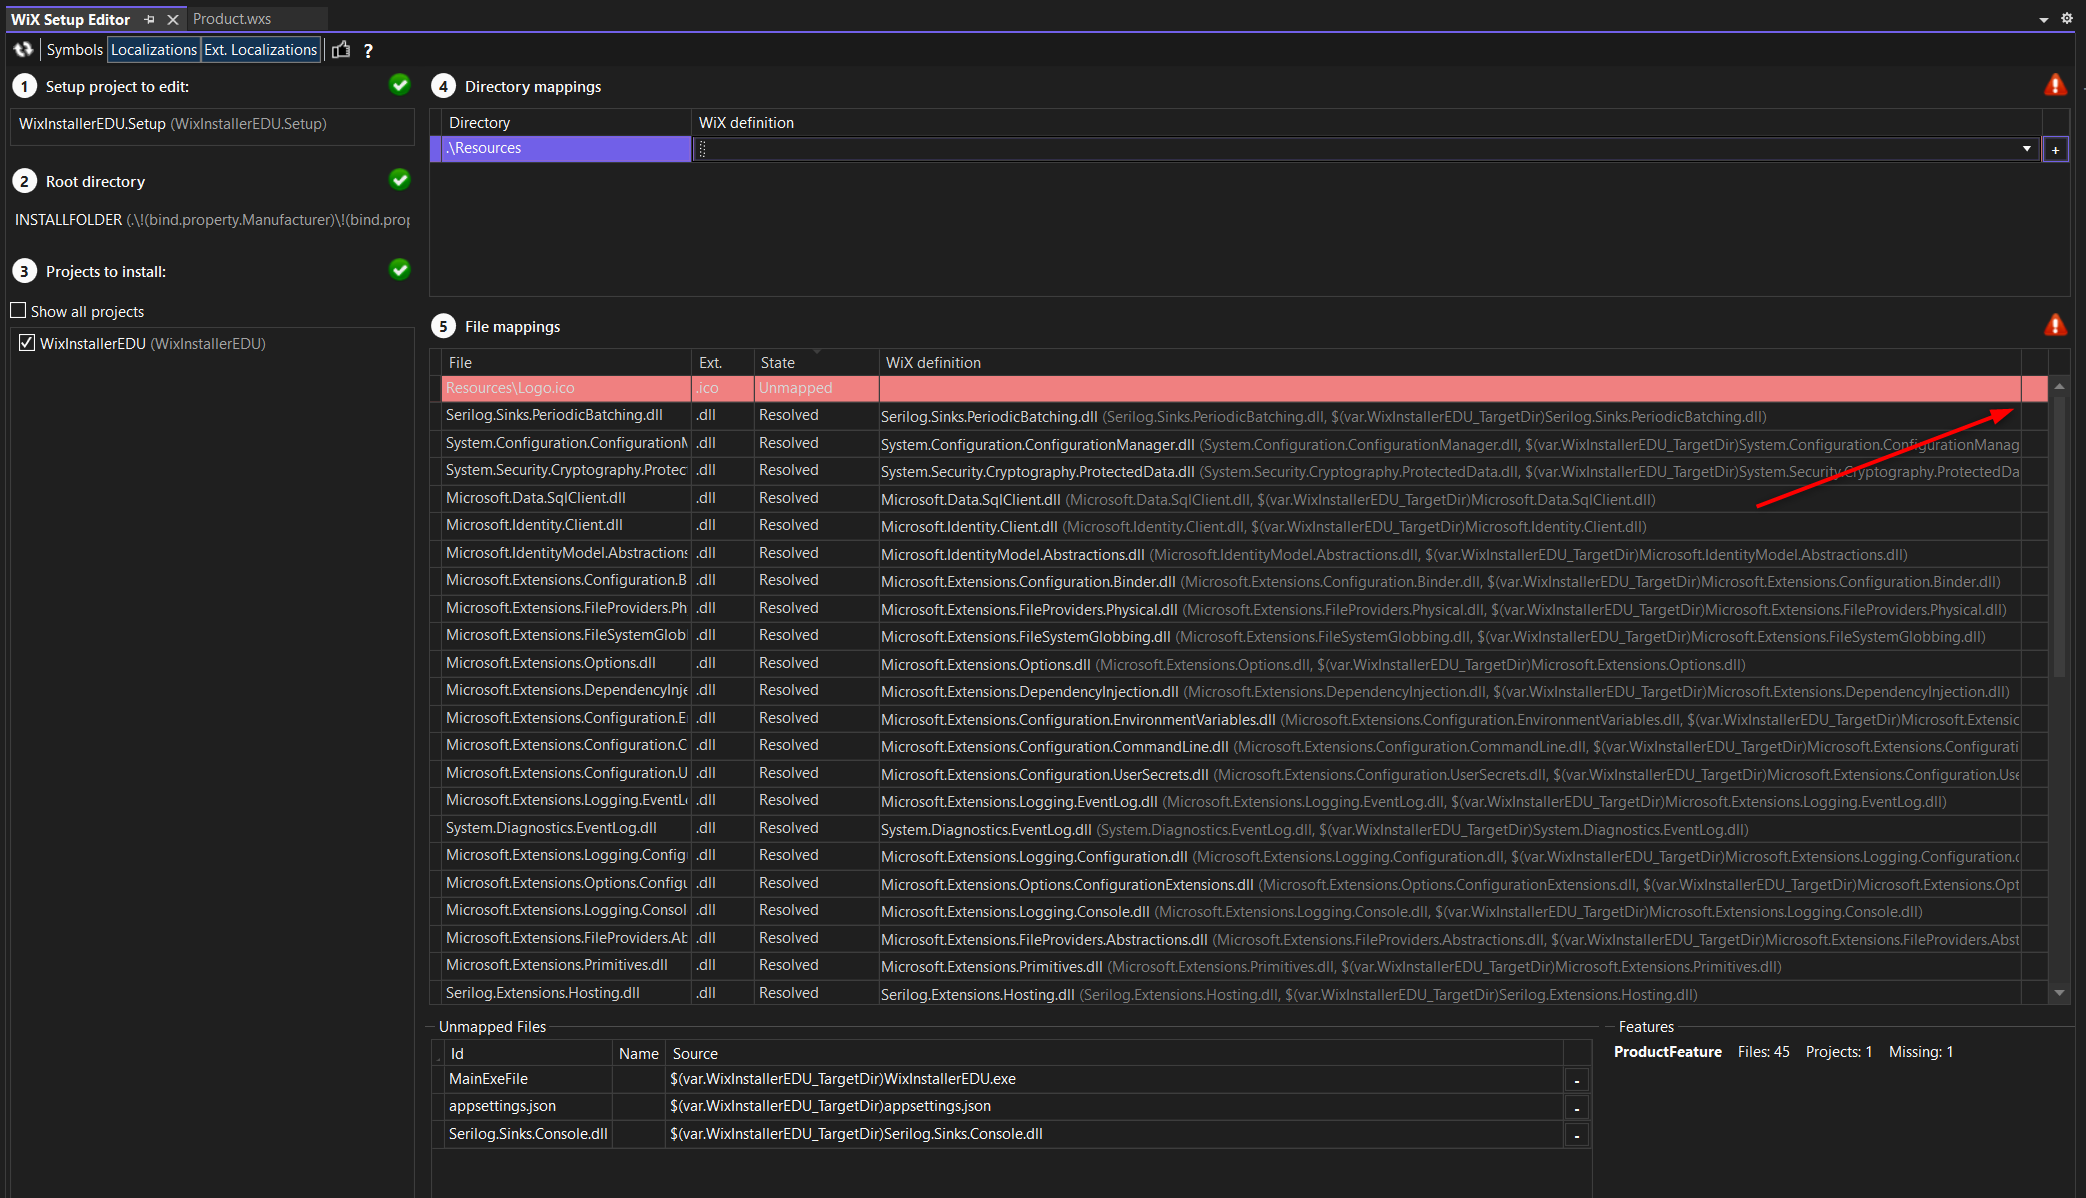
You can reference the needed project and files with clicking through the editor and then add the needed files with the + on the right side. The tool then generates the entires and a new GUID for each generated component.
Better dynamic harvesting method with heat.exe (recommended)
Heat ist a part of the WiX tool set and can generate a list of components based on a directory, a project file or on files themselves. With heat you are able to read from the Project output directory and generate the component list for the installer. This ensures to get all the DLLs from used NuGet Packages on every build and you don’t have to manage and monitor them every time you add something new or delete something from your projects.
To build the installer with heat, you also have to use variables, xml transform files, post build events and more to get a dynamic installer project with as little manual changes as possible.
One way to do this is to add the PostBuild event in the wixproj file:
1
2
3
<PropertyGroup>
  <PreBuildEvent>"$(WIX)bin\heat.exe" dir "$(SolutionDir)\$(ProductMainFolderName)\bin\$(ConfigurationName)\$(ProductTargetFramework)" -cg ProductComponents -gg -scom -sreg -sfrag -srd -dr INSTALLFOLDER -var var.Product.TargetDir -t "$(ProjectDir)Transform.xslt" -out "$(ProjectDir)ProductComponents.wxs"</PreBuildEvent>
</PropertyGroup>
The parameters ensure to only harvest the dlls and the important files. The RemoveExeFiles.xslt transformation file is used to exclude all .exe files from this process, because we need to add the main exe file manually for the dynamically gathered version number from this file.
Small Advice:
Add a new .gitignore file to exclude the generated ProductComponents.wxs file:
# Ignore dynamically generated ProductComponents.wxs file from harvesting process
ProductComponents.wxs
optional Features
You can define some Components or even ComponentGroups as additional/optional Features:
1
2
3
4
5
6
7
8
9
10
11
12
		<!-- List of Componentgroups for a feature to be installed -->
		<Feature Id="ProductFeatures" Title="$(var.ProductName).Setup" Level="1" Description="Installs the sample application." Absent="disallow">
			<ComponentGroupRef Id="MainExeComponentGroup" />
			<ComponentGroupRef Id="ProductComponents" />
			<ComponentGroupRef Id="ApplicationShortcuts" />
			<ComponentGroupRef Id="ApplicationDesktopShortcut" />
		</Feature>

		<!-- optional additional feature to be installed if chosen -->
		<Feature Id="OptionalFeatures" Title="OptionalFeatures.Setup" Level="2" Description="install optional Features.">
			<ComponentGroupRef Id="OptionalFeaturesComponents" />
		</Feature>
The OptionalFeatures have a lower Level than the default level 1, so they are not installed by default. You can change the default installation level to 3 with <Property Id="INSTALLLEVEL" Value=3 />. Every feature which is above this level will not be installed by default then.
A possible approach to have optional feature components is to harvest the minimum files per heat.exe and exclude optional files by name with the Transform.xslt. Then add the needed files manually in a ComponentGroup and as non default Features again.
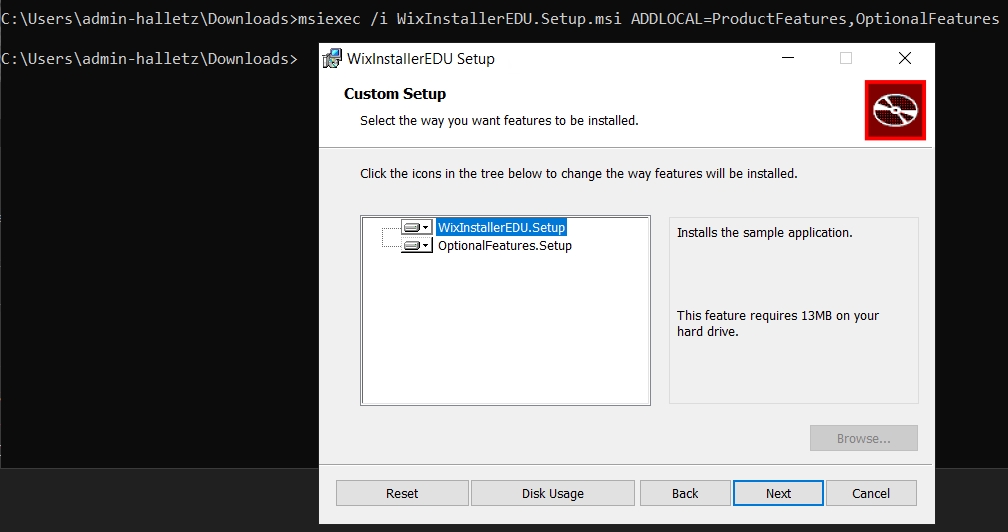
If you choose to not have a GUI installer, then you can add the installation of these features with the console call:
msiexec /i WixInstallerEDU.Setup.msi ADDLOCAL=ProductFeatures,OptionalFeatures
GUI
For a minimalistic GUI you can enable some prebuilt dialogs in the Product.wxs file:
1
2
<UIRef Id="WixUI_FeatureTree" />
<WixVariable Id="WixUILicenseRtf" Value="$(var.ProductProjectIconDir)Resources\License.rtf" />
These two lines enable a license screen and the selection of features for installation. Other dialogs can be looked up here: Wix Dialog options
Versioning
To sync the version we have to read the version number from a payload file, e.g. the exe file from the project. This file is manually added as separate Fragment, Component Group and Component and gets a certain ID to be referenced in the variables on the top in the variable definitions:
1
2
3
4
5
6
7
8
9
<!-- manually added exe file to get the version number -->
<!-- all other components will be harvested by post build event and heat.exe on each build -> ProductComponents.wxs -->
<Fragment>
	<ComponentGroup Id="MainExeComponentGroup" Directory="INSTALLFOLDER">
		<Component Id="MainExeComponent" Guid="{F63DFDB3-6C46-46E0-97FA-729C035A5B6F}">
			<File Id="MainExeFile" KeyPath="yes" Source="$(var.ProductTargetDir)$(var.ProductTargetExe)" />
		</Component>
	</ComponentGroup>
</Fragment>
Transforming the XML for excluding files
The Transforms.xslt contains transformation commands to prepare the ProductComponent.wsx file before the Setup Build Process reads it. The transform file commands can be used to exclude the manually added exe, the pdb files and more. The transforming happens after heat has harvested the Setup file components and transforms the outcome, the ProductComponent.wsx.
It only uses the XSLT V1.0 and is very ugly to change, so read the surrounding comments if you have to change something.
CI Build Pipe
The CI build pipe now also builds the MSI package. This can be copied to the staging folder separately and could be deployed to an admin share.

DevOps Pipeline Example
In MS Devops and a local build server, the CI pipe can be really simple and just call the VSBUILD Task to build the solution of the containing setup project without any further parameters.
Set the variables:
1
2
3
4
5
6
7
8
9
variables:
  - name: solution
    value: '**/*.sln'
  - name: buildPlatform
    value: 'Any CPU'
  - name: buildConfiguration
    value: 'Release'
  - name: SETUP_ENVIRONMENT
    value: 'DEVELOPMENT'
Then checkout, install needed tools, restore NuGet and start the build:
1
2
3
4
5
6
- task: VSBuild@1
  displayName: 'Build Solution'
  inputs:
    solution: '$(solution)'
    platform: '$(buildPlatform)'
    configuration: '$(buildConfiguration)'
But DevOps can also run the CI pipe in Cloud containers and I encountered a bug (GitHub Issue, StackOverflow Solution), that lets the WiX linker (light.exe) run into a deadlock. The solution was to configure the build to run with a special parameter msbuildArgs: '/p:RunWixToolsOutOfProc=true':
1
2
3
4
5
6
7
- task: VSBuild@1
  displayName: 'Build Solution'
  inputs:
    solution: '$(solution)'
    platform: '$(buildPlatform)'
    configuration: '$(buildConfiguration)'
    msbuildArgs: '/p:RunWixToolsOutOfProc=true'
This decouples the light process and prevents the deadlock. This bug got fixed for later versions of WiX, like 3.14 and 4.0, but these are currently in unstable mode and not finished yet.
If you then encounter an error that your resources use a 32 bit folder, but would be 64 bit components, add the flag <InstallerPlatform>x64</InstallerPlatform> in the wixproj file, to set the installer platform to 64 bit. This was only necessary for the cloud build somehow StackOverflow article.
Cert Signing preparation
If you want to sign your files and the Setup itself with a certificate in a CI/CD pipeline, then it’s recommended to separate the setup into its own solution.
The product solution takes care of the app and builds it into an output folder (can be the default one).
The Setup solution then contains the WIX Project. This doesn’t need the references to the main app project and can just harvest everything with heat.
It needs some further paths and var definitions in the wixproj file:
1
2
3
4
5
6
7
8
9
10
11
12
13
14
15
16
17
18
19
<!-- Reference paths to Product project dir and output dir for harvesting and File Version -->
  <PropertyGroup>
    <ProductTargetFramework>net7.0</ProductTargetFramework> <!-- Set this to targetFramework of Main Exe project -->
    <ProductMainFolderName>WixInstallerEDU</ProductMainFolderName>
    <ProductTargetDir>$(SolutionDir)\$(ProductMainFolderName)\bin\$(Configuration)\$(ProductTargetFramework)\</ProductTargetDir>
    <ProductProjectDir>$(SolutionDir)\$(ProductMainFolderName)\</ProductProjectDir>
    <DefineConstants>
      Product.TargetDir=$(ProductTargetDir);
      Product.ProjectDir=$(ProductProjectDir)
    </DefineConstants>
  </PropertyGroup>
  <!-- WIX heat auto harvest from output dir -->
  <PropertyGroup>
    <PreBuildEvent>"$(WIX)bin\heat.exe" dir "$(SolutionDir)\$(ProductMainFolderName)\bin\$(ConfigurationName)\$(ProductTargetFramework)" -cg ProductComponents -gg -scom -sreg -sfrag -srd -dr INSTALLFOLDER -var var.Product.TargetDir -t "$(ProjectDir)Transform.xslt" -out "$(ProjectDir)ProductComponents.wxs"</PreBuildEvent>
  </PropertyGroup>
  <PropertyGroup>
    <!-- deactivate ICE validation for light.exe. The validation would check the MSI package but needs a lot of components on the build server (especially core servers) to be reinstalled. -->
    <SuppressValidation>true</SuppressValidation>
  </PropertyGroup>
This ensures that the setup build process will find the output folder of the product’s main project and injects these paths to the Product.wxs file to refer to.
The heat process also needs to know the -var var.Product.TargetDir injection for creating the dynamic ProductComponents.wxs file.
With the SuppressValidation flag, the ICE Checks in the pipeline can be deactivated, especially important for newer pipeline Agents like on Windows Core Servers, which lack some components.
This can be set without worries if you test your MSI package yourself after build and then don’t constantly change its build process afterwards.
The CI/CD Build order would now be:
- build the main Project with all necessary files for the app
- sign those files with a cert, e.g. with singTool from Windows SDK
- now start building the Setup which harvests teh signed files from the first build
- sign the MSI setup itself
Note: If the sign process takes forever for a huge project, you can test excluding the dlls and only sign your exe files.
Further Information
If you need more MSI functionality or want to look deeper, then check these links:
- Youtube Creating Professional Installations with WiX Tips
- Example GitHub for the Youtube Tutorial
- WiX Upgrades and Modularization
- WiX Major Upgrade
- WiX Harvest Tool (Heat)
- Rob Mensching Installer Components
- Rob Mensching Component Rules 101
Full file contents
wixproj
1
2
3
4
5
6
7
8
9
10
11
12
13
14
15
16
17
18
19
20
21
22
23
24
25
26
27
28
29
30
31
32
33
34
35
36
37
38
39
40
41
42
43
44
45
46
47
48
49
50
51
52
53
54
55
56
57
58
59
60
61
62
63
64
65
66
67
68
<?xml version="1.0" encoding="utf-8"?>
<Project ToolsVersion="4.0" DefaultTargets="Build" InitialTargets="EnsureWixToolsetInstalled" xmlns="http://schemas.microsoft.com/developer/msbuild/2003">
  <PropertyGroup>
    <Configuration Condition=" '$(Configuration)' == '' ">Debug</Configuration>
    <Platform Condition=" '$(Platform)' == '' ">x64</Platform>
    <ProductVersion>3.10</ProductVersion>
    <ProjectGuid>fafe8c2d-cc73-4de5-8fc8-64fb3656aa85</ProjectGuid>
    <SchemaVersion>2.0</SchemaVersion>
    <OutputName Condition=" '$(SETUP_ENVIRONMENT)' == '' ">WixInstallerEDU.Setup</OutputName>
    <OutputName Condition=" '$(SETUP_ENVIRONMENT)' != '' ">WixInstallerEDU.$(SETUP_ENVIRONMENT).Setup</OutputName>
    <OutputType>Package</OutputType>
  </PropertyGroup>
  <PropertyGroup Condition=" '$(Configuration)|$(Platform)' == 'Debug|x86' ">
    <OutputPath>bin\$(Configuration)\</OutputPath>
    <IntermediateOutputPath>obj\$(Configuration)\</IntermediateOutputPath>
    <DefineConstants>Debug;</DefineConstants>
  </PropertyGroup>
  <PropertyGroup Condition=" '$(Configuration)|$(Platform)' == 'Release|x86' ">
    <OutputPath>bin\$(Configuration)\</OutputPath>
    <IntermediateOutputPath>obj\$(Configuration)\</IntermediateOutputPath>
  </PropertyGroup>
  <!-- Insert for x64-->
  <!-- Add this, change the Platform to x64 and change in VS all Configurations in Porpertie GUIs to x64 -> Rebuild -->
  <!-- https://stackoverflow.com/questions/28348496/wix-installer-unable-to-change-and-save-the-platform-to-64-bit -->
  <PropertyGroup Condition=" '$(Configuration)|$(Platform)' == 'Debug|x64' ">
    <DefineConstants>Debug</DefineConstants>
    <OutputPath>bin\$(Configuration)\</OutputPath>
    <IntermediateOutputPath>obj\$(Configuration)\</IntermediateOutputPath>
  </PropertyGroup>
  <PropertyGroup Condition=" '$(Configuration)|$(Platform)' == 'Release|x64' ">
    <OutputPath>bin\$(Configuration)\</OutputPath>
    <IntermediateOutputPath>obj\$(Configuration)\</IntermediateOutputPath>
    <SuppressPdbOutput>True</SuppressPdbOutput>
  </PropertyGroup>
  <ItemGroup>
    <Compile Include="ProductComponents.wxs" />
    <Compile Include="Product.wxs" />
  </ItemGroup>
  <ItemGroup>
    <Content Include="Transform.xslt">
      <CopyToOutputDirectory>Always</CopyToOutputDirectory>
    </Content>
  </ItemGroup>
  <Import Project="$(WixTargetsPath)" Condition=" '$(WixTargetsPath)' != '' " />
  <Import Project="$(MSBuildExtensionsPath32)\Microsoft\WiX\v3.x\Wix.targets" Condition=" '$(WixTargetsPath)' == '' AND Exists('$(MSBuildExtensionsPath32)\Microsoft\WiX\v3.x\Wix.targets') " />
  <Target Name="EnsureWixToolsetInstalled" Condition=" '$(WixTargetsImported)' != 'true' ">
    <Error Text="The WiX Toolset v3.11 build tools must be installed to build this project. To download the WiX Toolset, see https://wixtoolset.org/releases/v3.11/stable" />
  </Target>
  <!-- Reference paths to Product project dir and output dir for harvesting and File Version -->
  <PropertyGroup>
    <ProductTargetFramework>net7.0</ProductTargetFramework> <!-- Set this to targetFramework of Main Exe project -->
    <ProductMainFolderName>WixInstallerEDU</ProductMainFolderName>
    <ProductTargetDir>$(SolutionDir)\$(ProductMainFolderName)\bin\$(Configuration)\$(ProductTargetFramework)\</ProductTargetDir>
    <ProductProjectDir>$(SolutionDir)\$(ProductMainFolderName)\</ProductProjectDir>
    <DefineConstants>
      Product.TargetDir=$(ProductTargetDir);
      Product.ProjectDir=$(ProductProjectDir)
    </DefineConstants>
  </PropertyGroup>
  <!-- WIX heat auto harvest from output dir -->
  <PropertyGroup>
    <PreBuildEvent>"$(WIX)bin\heat.exe" dir "$(SolutionDir)\$(ProductMainFolderName)\bin\$(ConfigurationName)\$(ProductTargetFramework)" -cg ProductComponents -gg -scom -sreg -sfrag -srd -dr INSTALLFOLDER -var var.Product.TargetDir -t "$(ProjectDir)Transform.xslt" -out "$(ProjectDir)ProductComponents.wxs"</PreBuildEvent>
  </PropertyGroup>
  <PropertyGroup>
    <!-- deactivate ICE validation for light.exe. The validation would check the MSI package but needs a lot of components on the build server (especially core servers) to be reinstalled. -->
    <SuppressValidation>true</SuppressValidation>
  </PropertyGroup>
</Project>
Product.wxs
1
2
3
4
5
6
7
8
9
10
11
12
13
14
15
16
17
18
19
20
21
22
23
24
25
26
27
28
29
30
31
32
33
34
35
36
37
38
39
40
41
42
43
44
45
46
47
48
49
50
51
52
53
54
55
56
57
58
59
60
61
62
63
64
65
66
67
68
69
70
71
72
73
74
75
76
77
78
79
80
81
82
83
84
85
86
87
88
89
90
91
92
93
94
95
96
97
98
99
100
101
102
103
104
105
106
107
108
109
110
111
112
113
114
115
116
117
118
119
120
121
122
123
124
125
126
127
128
129
130
131
132
133
134
135
136
137
138
139
140
141
142
143
144
145
146
147
148
149
150
151
152
153
154
155
156
157
158
159
160
161
162
163
164
165
166
167
168
169
170
171
172
173
174
175
176
177
178
179
180
181
182
183
184
185
186
187
188
189
190
191
192
193
<?xml version="1.0" encoding="UTF-8"?>
<Wix xmlns="http://schemas.microsoft.com/wix/2006/wi">

	<!-- define dynamic variables here -->
	<?define ProductManufacturer="Hermann Otto GmbH" ?>
	<?define PackageDescription="WiX Installer EDU Project" ?>
	<?define ProductTargetDir=$(var.Product.TargetDir) ?>
	<?define ProductProjectIconDir=$(var.Product.ProjectDir) ?>
	<?define ProductTargetExe="WixInstallerEDU.exe" ?>
	<?define ProductVersion="!(bind.FileVersion.MainExeFile)" ?>
	<?define ProductHelpLink=https://dev.azure.com/OttoChemie/Ausbildung/_git/WixInstallerEDU?>

	<!-- set environment dependent values -->
	<?ifdef env.SETUP_ENVIRONMENT?>
	<!-- DEVELOPMENT -->
	<?if $(env.SETUP_ENVIRONMENT)=DEVELOPMENT?>
	<?define ProductName="WixInstallerEDU.DEVELOPMENT" ?>
	<?define ShortcutName="WixInstallerEDU - DEVELOPMENT" ?>
	<?define UpgradeCodeGUID="{9682658F-AD3E-414E-BD27-228B3B2B37DD}" ?>
	<?define ApplicationShortcutGUID="{01E478D8-A4FE-4138-B945-6030B774B6BE}" ?>
	<?define DesktopShortcutGUID="{D8F54CD5-8267-4137-8147-7CF706B141F4}" ?>
	<?endif?>
	<!-- BETA -->
	<?if $(env.SETUP_ENVIRONMENT)=BETA?>
	<?define ProductName="WixInstallerEDU.BETA" ?>
	<?define ShortcutName="WixInstallerEDU - BETA" ?>
	<?define UpgradeCodeGUID="{1DBABF4D-4263-4711-A909-561A949F0F75}" ?>
	<?define ApplicationShortcutGUID="{079DE843-1B8C-49F6-8DF7-63E0EE873FF7}" ?>
	<?define DesktopShortcutGUID="{F1D19ABD-4454-46C1-9A4B-B95A75B9DD87}" ?>
	<?endif?>
	<?else?>
	<!-- PRODUCTION -->
	<?define ProductName="WixInstallerEDU" ?>
	<?define ShortcutName="WixInstallerEDU - NEU" ?>
	<?define UpgradeCodeGUID="{16F1754E-C22F-4266-81FD-EBB841911566}" ?>
	<?define ApplicationShortcutGUID="{DD9E215A-0BE0-4E63-A02F-48F0D196A474}" ?>
	<?define DesktopShortcutGUID="{101DFDA8-1EAC-4718-B9C4-7B1EE0022323}" ?>
	<?endif?>

	<!-- * GUID for Product and Package are ok for Major upgrades, only UpgradeCode GUID has to stay for the specific ENV -->
	<Product Id="*"
			 Name="$(var.ProductName)"
			 Language="1033"
			 Version="$(var.ProductVersion)"
			 Manufacturer="$(var.ProductManufacturer)"
			 UpgradeCode="$(var.UpgradeCodeGUID)">
		<Package Id="*"
				 Description="$(var.PackageDescription)"
				 InstallerVersion="200"
				 Compressed="yes"
				 InstallScope="perMachine"
				 Platform="x64" />

		<!-- trigger major upgrade https://wixtoolset.org/docs/v3/howtos/updates/major_upgrade/ with earlier schedule -->
		<MajorUpgrade Schedule="afterInstallInitialize"
					  DowngradeErrorMessage="A newer version of [ProductName] is already installed." />

		<!-- Pack all files, inlcuding the cab archive into the MSI -->
		<MediaTemplate EmbedCab="yes" />

		<!-- UI and Licensefile as rtf -->
		<!--<UIRef Id="WixUI_FeatureTree" />
		<WixVariable Id="WixUILicenseRtf" Value="$(var.ProductProjectIconDir)Resources\License.rtf" />-->

		<!-- List of Componentgroups for a feature to be installed -->
		<Feature Id="ProductFeatures" Title="$(var.ProductName).Setup" Level="1" Description="Installs the sample application." Absent="disallow">
			<ComponentGroupRef Id="MainExeComponentGroup" />
			<ComponentGroupRef Id="ProductComponents" />
			<ComponentGroupRef Id="ApplicationShortcuts" />
			<ComponentGroupRef Id="ApplicationDesktopShortcut" />
		</Feature>

		<!-- optional additional feature to be installed if chosen -->
		<Feature Id="OptionalFeatures" Title="OptionalFeatures.Setup" Level="2" Description="install optional Features.">
			<ComponentGroupRef Id="OptionalFeaturesComponents" />
		</Feature>

		<!-- Conditional Block checking if env var exists and if it has specific value for changing the Shortcut name -->
		<!-- This only sets a icon for the programmed application UI, not for the shortcut or the start menu -->
		<?ifdef env.SETUP_ENVIRONMENT?>
		<?if $(env.SETUP_ENVIRONMENT)=DEVELOPMENT?>
		<Icon Id="AppIcon" SourceFile="$(var.ProductProjectIconDir)Resources\Dev.ico" />
		<Property Id="ARPPRODUCTICON" Value="AppIcon" />
		<?endif?>
		<?if $(env.SETUP_ENVIRONMENT)=BETA?>
		<Icon Id="AppIcon" SourceFile="$(var.ProductProjectIconDir)Resources\Beta.ico" />
		<Property Id="ARPPRODUCTICON" Value="AppIcon" />
		<?endif?>
		<?else?>
		<Icon Id="AppIcon" SourceFile="$(var.ProductProjectIconDir)Resources\Prod.ico" />
		<Property Id="ARPPRODUCTICON" Value="AppIcon" />
		<?endif?>

		<!-- Provide information links to be displayed in "Programs and Features" -->
		<Property Id="ARPURLINFOABOUT"  Value="$(var.ProductHelpLink)" />
		<Property Id="ARPHELPLINK"      Value="$(var.ProductHelpLink)" />
		<Property Id="ARPURLUPDATEINFO" Value="$(var.ProductHelpLink)" />
	</Product>

	<!-- Directories -->
	<Fragment>
		<Directory Id="TARGETDIR" Name="SourceDir">
			<!-- Program Files Folder -->
			<!-- use this ID and Package attribute Platform="x64" to use the 64 bit folder instead of (x86)  -->
			<!-- https://stackoverflow.com/questions/5479790/wix-how-to-override-c-program-files-x86-on-x64-machine-in-wixui-advanced-s -->
			<Directory Id="ProgramFiles64Folder">
				<Directory Id="MANUFACTURERFOLDER" Name="!(bind.property.Manufacturer)">
					<Directory Id="INSTALLFOLDER" Name="!(bind.property.ProductName)" />
				</Directory>
			</Directory>
			<!-- Start Menu Folder -->
			<Directory Id="ProgramMenuFolder">
				<Directory Id="ApplicationProgramsFolder" Name="!(bind.property.ProductName)" />
			</Directory>
			<!-- Desktop Shortcut -->
			<Directory Id="DesktopFolder" Name="Desktop" />
		</Directory>
	</Fragment>

	<!-- Provide application and uninstall shortcuts in the start menu -->
	<Fragment>
		<ComponentGroup Id="ApplicationShortcuts">
			<Component Id="ApplicationShortcuts"
					   Guid="$(var.ApplicationShortcutGUID)"
					   Directory="ApplicationProgramsFolder">
				<Shortcut Id="ApplicationShortcut"
						  Name="$(var.ShortcutName)"
						  Description="Starts $(var.ShortcutName)"
						  Target="[INSTALLFOLDER]$(var.ProductTargetExe)"
						  WorkingDirectory="INSTALLFOLDER" />
				<Shortcut Id="UninstallShortcut"
						  Name="Uninstall !(bind.property.ProductName)"
						  Description="Uninstalls !(bind.property.ProductName)"
						  Target="[System64Folder]msiexec.exe"
						  Arguments="/x [ProductCode]" />
				<RegistryValue Root="HKCU"
							   Key="Software\!(bind.property.Manufacturer)\!(bind.property.ProductName)"
							   Name="ApplicationShortcutsInstalled"
							   Type="integer"
							   Value="1"
							   KeyPath="yes" />
				<RemoveFolder Id="ApplicationProgramsFolder" On="uninstall" />
			</Component>
		</ComponentGroup>
	</Fragment>

	<!-- Create a Desktop Shortcut -->
	<Fragment>
		<ComponentGroup Id="ApplicationDesktopShortcut">
			<Component Id="ApplicationDesktopShortcut"
					   Guid="$(var.DesktopShortcutGUID)"
					   Directory="DesktopFolder">
				<Shortcut Id="ApplicationDesktopShortcut"
						  Name="$(var.ShortcutName)"
						  Description="$(var.ShortcutName)"
						  Target="[INSTALLFOLDER]$(var.ProductTargetExe)"
						  WorkingDirectory="INSTALLFOLDER" />
				<RegistryValue Root="HKCU"
							   Key="Software\!(bind.property.Manufacturer)\!(bind.property.ProductName)"
							   Name="ApplicationDesktopShortcutInstalled"
							   Type="integer"
							   Value="1"
							   KeyPath="yes" />
			</Component>
		</ComponentGroup>
	</Fragment>

	<!-- manually added exe file to get the version number -->
	<!-- all other components will be harvested by post build event and heat.exe on each build -> ProductComponents.wxs -->
	<Fragment>
		<ComponentGroup Id="MainExeComponentGroup" Directory="INSTALLFOLDER">
			<Component Id="MainExeComponent" Guid="{F63DFDB3-6C46-46E0-97FA-729C035A5B6F}">
				<File Id="MainExeFile" KeyPath="yes" Source="$(var.ProductTargetDir)$(var.ProductTargetExe)" />
			</Component>
		</ComponentGroup>
	</Fragment>

	<!-- manually added optional feature components -->
	<!-- all other components will be harvested by post build event and heat.exe on each build -> ProductComponents.wxs -->
	<Fragment>
		<ComponentGroup Id="OptionalFeaturesComponents" Directory="INSTALLFOLDER">
			<Component Id="Feature01Comp" Guid="{C3A936A9-EF50-491D-9A91-BFF37345BE7B}">
				<File Id="Feature01File" KeyPath="yes" Source="$(var.ProductTargetDir)Feature01.txt" />
			</Component>
			<Component Id="Feature02Comp" Guid="{041FF6F3-237C-4D44-A72B-ED7BFE983DA0}">
				<File Id="Feature02File" KeyPath="yes" Source="$(var.ProductTargetDir)Feature02.txt" />
			</Component>
			<Component Id="Feature03Comp" Guid="{CA6A45D8-F3D5-4C9C-979A-550A4E9451E3}">
				<File Id="Feature03File" KeyPath="yes" Source="$(var.ProductTargetDir)Feature03.txt" />
			</Component>
		</ComponentGroup>
	</Fragment>
</Wix>
RemoveExeFiles.xslt Transform file to exclude exe file from harvesting
1
2
3
4
5
6
7
8
9
10
11
12
13
14
15
16
17
18
19
20
21
22
23
24
25
26
27
28
29
30
31
32
33
34
35
36
37
38
39
40
41
42
43
44
45
46
47
48
49
50
51
52
53
54
55
56
57
58
59
60
61
62
63
64
<?xml version="1.0" encoding="utf-8"?>
<xsl:stylesheet
    xmlns:xsl="http://www.w3.org/1999/XSL/Transform"
    xmlns:wix="http://schemas.microsoft.com/wix/2006/wi"
    xmlns="http://schemas.microsoft.com/wix/2006/wi"

    version="1.0"
    exclude-result-prefixes="xsl wix">

	<xsl:output method="xml" indent="yes" omit-xml-declaration="yes" />
	<xsl:strip-space elements="*" />

	<!--
    Find all <Component> elements with <File> elements with Source="" attributes ending in ".exe" and tag it with the "ExeToRemove" key.

    <Component Id="cmpSYYKP6B1M7WSD5KLEQ7PZW4YLOPYG61L" Directory="INSTALLDIR" Guid="*">
        <File Id="filKUS7ZRMJ0AOKDU6ATYY6IRUSR2ECPDFO" KeyPath="yes" Source="!(wix.StagingAreaPath)\ProofOfPEqualsNP.exe" />
    </Component>

    Because WiX's Heat.exe only supports XSLT 1.0 and not XSLT 2.0 we cannot use `ends-with( haystack, needle )` (e.g. `ends-with( wix:File/@Source, '.exe' )`...
    ...but we can use this longer `substring` expression instead (see https://github.com/wixtoolset/issues/issues/5609 )
    -->
	<!-- Get the last 4 characters of a string using `substring( s, len(s) - 3 )`, it uses -3 and not -4 because XSLT uses 1-based indexes, not 0-based indexes. -->
	<!-- substring( string, start, [length] ) -->
	<xsl:key
        name="ExeToRemove"
        match="wix:Component[ substring( wix:File/@Source, string-length( wix:File/@Source ) - 3 ) = '.exe' ]"
        use="@Id" />

	<!-- Remove all serversettings[.*].json files. The serversettings.json will be added manually -->
	<!-- Documentation: https://www.obqo.de/w3c-trans/xpath-de/#strings -->
	<!-- boolean contains(string, string) -->
	<!-- <xsl:key
        name="serversettingsToRemove"
        match="wix:Component[ contains( wix:File/@Source, 'serversettings.' ) ]"
        use="@Id" /> -->

	<!-- Remove all appsettings[.*].json files. The serversettings.json will be added manually -->
	<!-- Documentation: https://www.obqo.de/w3c-trans/xpath-de/#strings -->
	<!-- boolean contains(string, string) -->
	<!-- <xsl:key
        name="appsettingsToRemove"
        match="wix:Component[ contains( wix:File/@Source, 'appsettings.' ) ]"
        use="@Id" /> -->

	<!-- Remove .pdb files -->
	<xsl:key
        name="PdbToRemove"
        match="wix:Component[ substring( wix:File/@Source, string-length( wix:File/@Source ) - 3 ) = '.pdb' ]"
        use="@Id" />

	<!-- By default, copy all elements and nodes into the output... -->
	<xsl:template match="@*|node()">
		<xsl:copy>
			<xsl:apply-templates select="@*|node()" />
		</xsl:copy>
	</xsl:template>

	<!-- ...but if the element has a filtered key then don't render anything (i.e. removing it from the output) -->
	<xsl:template match="*[ self::wix:Component or self::wix:ComponentRef ][ key( 'ExeToRemove', @Id ) ]" />
	<!-- <xsl:template match="*[ self::wix:Component or self::wix:ComponentRef ][ key( 'serversettingsToRemove', @Id ) ]" /> -->
	<!-- <xsl:template match="*[ self::wix:Component or self::wix:ComponentRef ][ key( 'appsettingsToRemove', @Id ) ]" /> -->
	<xsl:template match="*[ self::wix:Component or self::wix:ComponentRef ][ key( 'PdbToRemove', @Id ) ]" />
</xsl:stylesheet>