Windows Service Deployment
DevOps has separate pipelines for deployments, the so called Release Pipes. This article aims to describe a solution to deploy a Windows Service via a company hosted on premise build server and a target server to run the service. The target server has to be accessible for the Pipeline Service Agent User and the network paths and privileges for installing and controlling the services on the target machine have to be set up.
This Release Pipe design uses the PowerShell Tasks and a Copy Files Task. You could use the PowerShell on target machine where you open a PowerShell Session on the remote machine as well, but this article shows the “normal” PowerShell Tasks with inline scripts which could be run by a admin from the build server manually as well.
Tasks
The sequence of tasks contain:
- stopping the remote service
- backup the current files for recovery
- uninstall the service
- deploy new version of assemblies and files
- install the new service version
- start the service
The pipeline separates all these steps into single tasks for better debugging and maintenance.
Pipeline variables
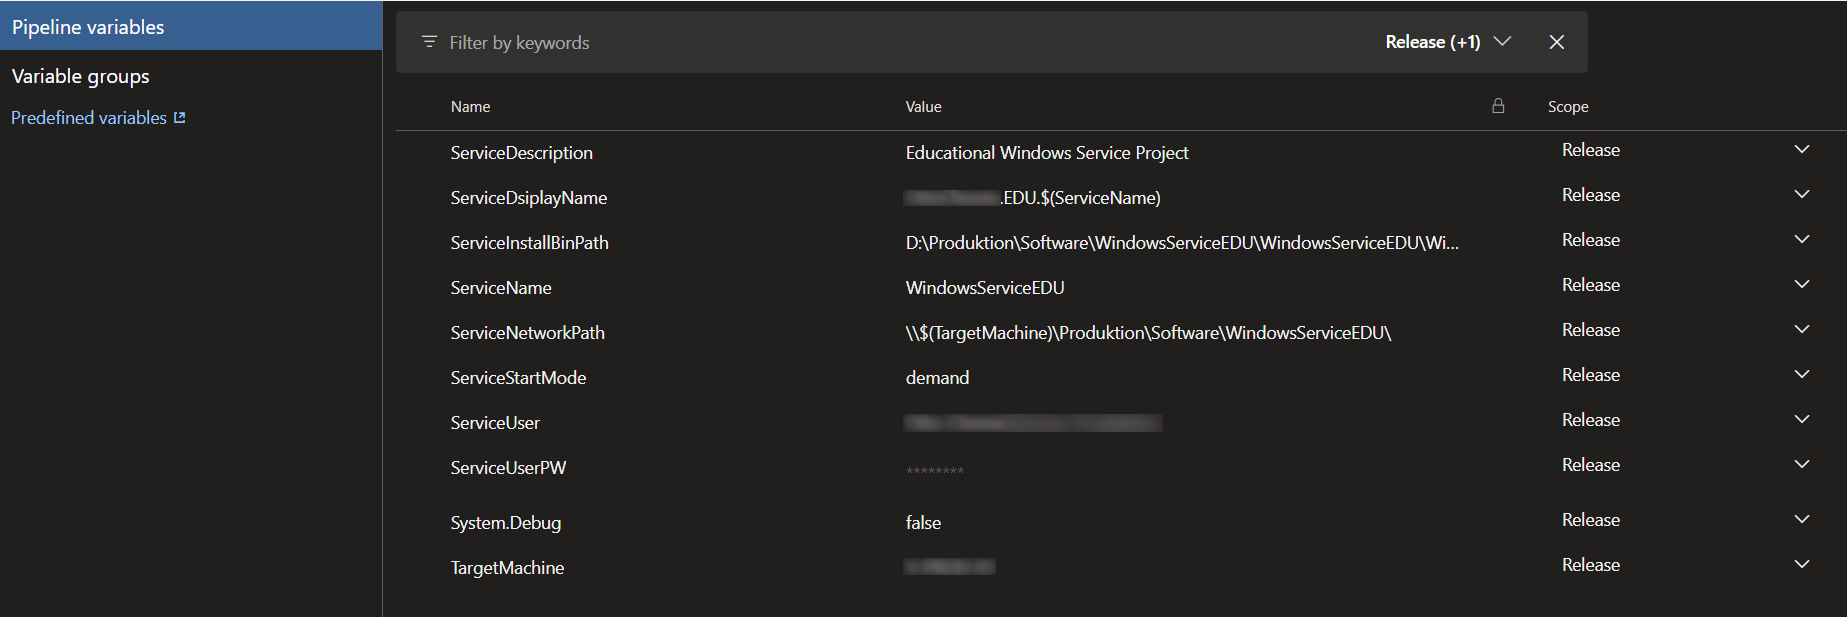
The pipeline is designed to use pipeline scope variables, which can be accessed from any task in the pipe to reuse some common values.
Stop Service
This script gets the service from the remote machine and stops it:
1
2
3
4
5
6
7
8
9
10
11
12
13
14
15
16
17
18
19
20
$MachineName = $Env:TargetMachine
$ServiceName = $Env:ServiceName

Write-Host "Stopping the Service $($ServiceName) on machine $($MachineName):"

$Service = Get-Service -Computername $MachineName -Name $ServiceName -ErrorAction SilentlyContinue
if($Service -eq $null)
{
    Write-Host "Service $($ServiceName) was not found, nothing to stop."
} else {
    if($Service.Status -ne "Stopped")
	{
		Write-Host "Stopping the Service $($ServiceName) ..."
		$Service.Stop()
		Write-Host "Done."
	} else
    {
        Write-Host "Service $($ServiceName) was already stopped."
    }
}
Create Backup
This script creates a backup in the working directory as a named zip file for later recovery. The name has a timestamp in it:
1
2
3
4
5
6
7
8
9
$Date = $(Get-Date -Format yyyyMMdd-HHmmss)
$ServiceName = $Env:ServiceName
$WorkingDir = $Env:ServiceNetworkPath

Write-Host "Creating Backup at $($WorkingDir)\$($ServiceName)_$($Date).zip ..."

Compress-Archive -Path "$($WorkingDir)\$($ServiceName)" -DestinationPath "$($WorkingDir)\$($ServiceName)_$($Date).zip" -Force

Write-Host "Done."
Uninstall Service
This Task would also stop the service from the remote machine and then uninstall it. Uninstalling a running service would just mark it for deletion and it will continue running until it gets stopped from elsewhere.
1
2
3
4
5
6
7
8
9
10
11
12
13
14
15
16
17
18
19
20
21
$MachineName = $Env:TargetMachine
$ServiceName = $Env:ServiceName

Write-Host "Uninstalling the Service $($ServiceName) on machine $($MachineName):"

$Service = Get-Service -Computername $MachineName -Name $ServiceName -ErrorAction SilentlyContinue
if($Service -eq $null)
{
    Write-Host "Service $($ServiceName) was not found, nothing to uninstall."
} else {
    if($Service.Status -ne "Stopped")
	{
		Write-Host "Stopping the Service $($ServiceName) ..."
		$Service.Stop()
		Write-Host "Done."
	}

	Write-Host "Uninstall Service $($ServiceName) ..."
	sc.exe "\\$($MachineName)" delete $ServiceName
	Write-Host "Done."
}
Deploy Files
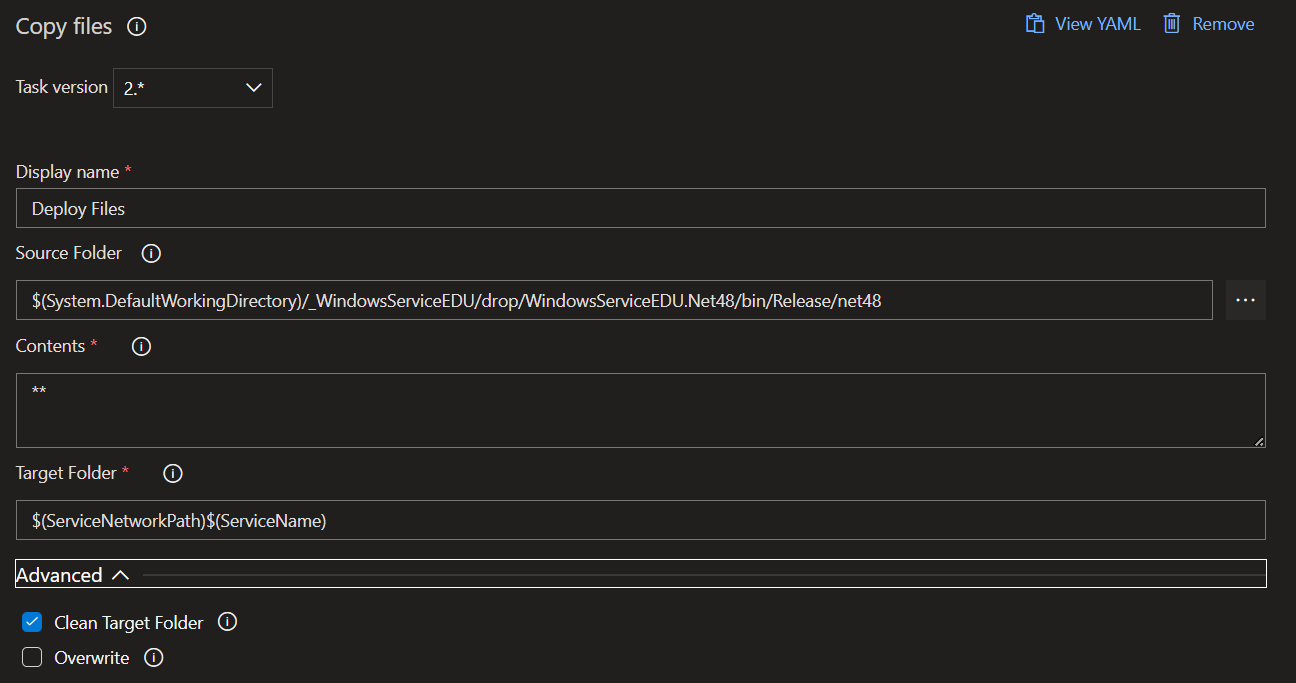
This task is a simple CopyFiles task with the option to clear the target folder set to true and the target folder is combined from pipeline variable values:
Install Service
This script has multiple variables set from the pipeline variables. These contain the common strings and values for installing a service with a given service user, its credentials, naming and description as well as a start mode and recovery handling on failure. The task uses the sc.exe to install the service remotely. This tool has a special way to get its parameters. You have to write them <paramName>= <value> and the passwort of the service user has to be set directly.
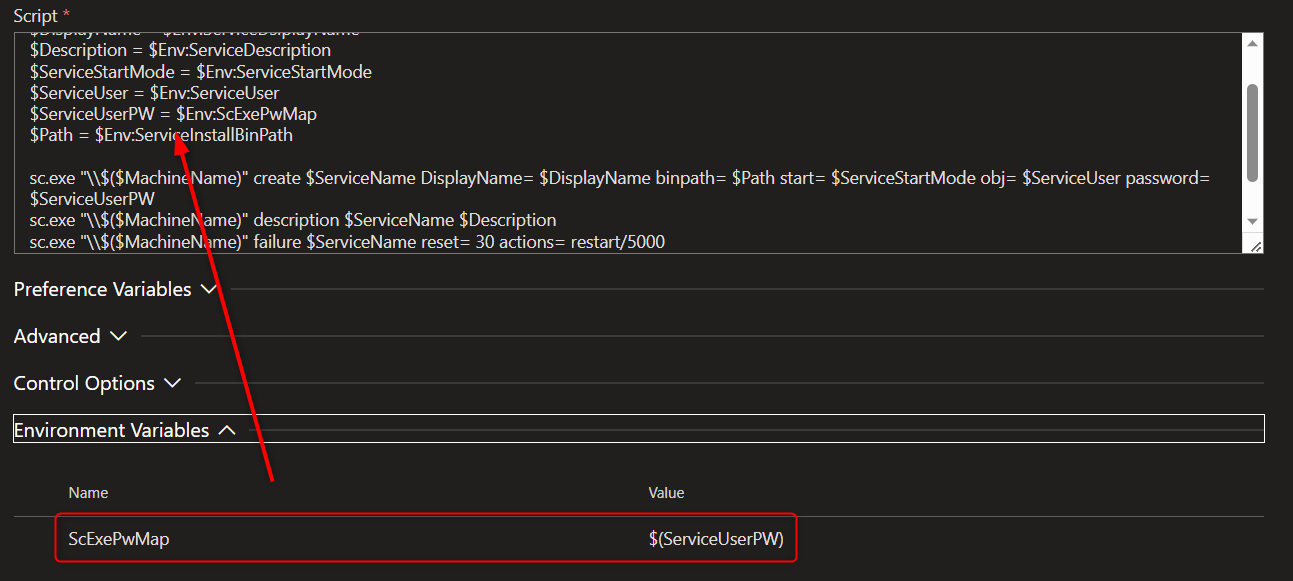
The pipeline passwort variable is a secret and has to be mapped to a local decrypted string here. This can be done with defining a mapping variable for this task:
The sc.exe creates or installs teh service, then sets its description and finally configures the failure recovery to restart the service.
1
2
3
4
5
6
7
8
9
10
11
12
13
14
$MachineName = $Env:TargetMachine
$ServiceName = $Env:ServiceName
$DisplayName = $Env:ServiceDisplayName
$Description = $Env:ServiceDescription
$ServiceStartMode = $Env:ServiceStartMode
$ServiceUser = $Env:ServiceUser
$ServiceUserPW = $Env:ScExePwMap
$Path = $Env:ServiceInstallBinPath

sc.exe "\\$($MachineName)" create $ServiceName DisplayName= $DisplayName binpath= $Path start= $ServiceStartMode obj= $ServiceUser password= $ServiceUserPW
sc.exe "\\$($MachineName)" description $ServiceName $Description
sc.exe "\\$($MachineName)" failure $ServiceName reset= 30 actions= restart/5000

Write-Host "Done."
Start the Service
The last task starts the service:
1
2
3
4
5
6
7
8
9
$MachineName = $Env:TargetMachine
$ServiceName = $Env:ServiceName

Write-Host "Starting the Service $($ServiceName) on machine $($MachineName) ..."

$Service = Get-Service -Computername $MachineName -Name $ServiceName -ErrorAction SilentlyContinue
$Service.Start()

Write-Host "Done."
Manually Installing a service with Credentials
If you need to install a service with credentials manually, you could use the following script:
1
2
3
4
5
6
7
8
9
10
11
12
13
14
$MachineName = "REMOTE_SERVER"
$ServiceName = "WindowsServiceEDU"
$DisplayName = "WindowsServiceEDU Displayname"
$Description = "Some Description"
$StartUpMode = "demand"
$ServiceUser = "SERVICE_USER"
$Path = "PATH_TO_SERVICE_EXE"
$Cred = Get-Credential -Username $ServiceUser -Message "Please enter the login data:"

sc.exe "\\$($MachineName)" create $ServiceName DisplayName= $DisplayName binpath= $Path start= $StartUpMode obj= $Cred.UserName password= $Cred.GetNetworkCredential().Password
sc.exe "\\$($MachineName)" description $ServiceName $Description
sc.exe "\\$($MachineName)" failure $ServiceName reset= 30 actions= restart/5000

$Cred = $null
The script uses the Get-Credential command to temporarily store the login data. This command can be prefilled with a username and a message for the Credentials window. The password gets encrypted and stored in the other credential values in the $Cred variable and can be accessed as secret string via $Cred.Password or unencrypted via $Cred.GetNetworkCredential().Password.


