RestApiKeyAuthEDU
This article demonstrates how you can implement authentication on a restful API with keys. Consumer will need to provide accepted keys to call API endpoints. The implementations work without any new packages and implements a request pipeline middleware.
API key and middleware
This approach uses the authentication with a fixed API key from a secrets store or the configuration. It hides the complete API behind the Authentication and all endpoint always need a matching key.
Key storage
In this example the key is stored in the appsettings.json in a section called ‘Authentication:ApiKey’:
1
2
3
"Authentication": {
    "ApiKey": "EXAMPLE-KEY-MAYBE-GUID"
  }
Middleware and classes
A good practice to access this fixed key and section is to use a constants class with all string constants in it:
1
2
3
4
5
6
7
8
9
namespace RestApiKeyAuthEDU.Authentication;

public class AuthConstants
{
    public const string ApiKeySectionName = "Authentication:ApiKey";
    public const string ApiKeyHeaderName = "X-Api-Key";
    public const string ApiKeyMissing = "Api Key missing";
    public const string ApiKeyInvalid = "INvalid API Key";
}
The middleware then has the code to receive the HttpContext from the prior request pipeline middleware and search for the auth header. If the header is missing, or the given API key is not matching the accepted one, there will be a code 401 response with a message. The return; will then end the request pipeline and end the request. If everything is fine, it will call the next pipeline middleware and continue.
1
2
3
4
5
6
7
8
9
10
11
12
13
14
15
16
17
18
19
20
21
22
23
24
25
26
27
28
29
30
31
32
33
34
35
namespace RestApiKeyAuthEDU.Authentication;

public class ApiKeyAuthMiddleware
{
    private readonly RequestDelegate _next;
    private readonly IConfiguration _configuration;

    public ApiKeyAuthMiddleware(RequestDelegate next, IConfiguration configuration)
    {
        _next = next;
        _configuration = configuration;
    }

    public async Task InvokeAsync(HttpContext context)
    {
        // check if the header from the request has the API key set as header
        if (!context.Request.Headers.TryGetValue(AuthConstants.ApiKeyHeaderName, out var extractedApiKey))
        {
            context.Response.StatusCode = 401;
            await context.Response.WriteAsync(AuthConstants.ApiKeyMissing);
            return;
        }

        // check if the transmitted API key matches the configured one
        var apiKey = _configuration.GetValue<string>(AuthConstants.ApiKeySectionName);
        if (!apiKey.Equals(extractedApiKey))
        {
            context.Response.StatusCode = 401;
            await context.Response.WriteAsync(AuthConstants.ApiKeyInvalid);
            return;
        }

        await _next(context); // continue in the pipeline and leave this middleware
    }
}
Activate the middleware in Program.cs between the other middlewares, before the ``:
1
2
3
4
5
6
7
8
// ...
app.UseHttpsRedirection();

// Register our own API key middleware here ...
app.UseMiddleware<ApiKeyAuthMiddleware>();

app.UseAuthorization();
// ...
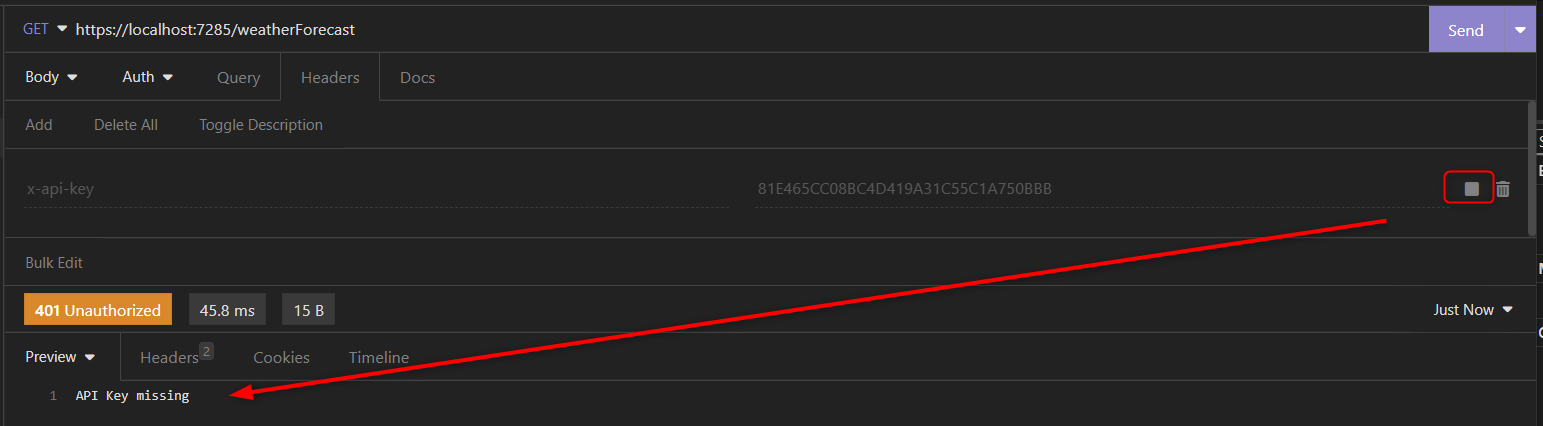
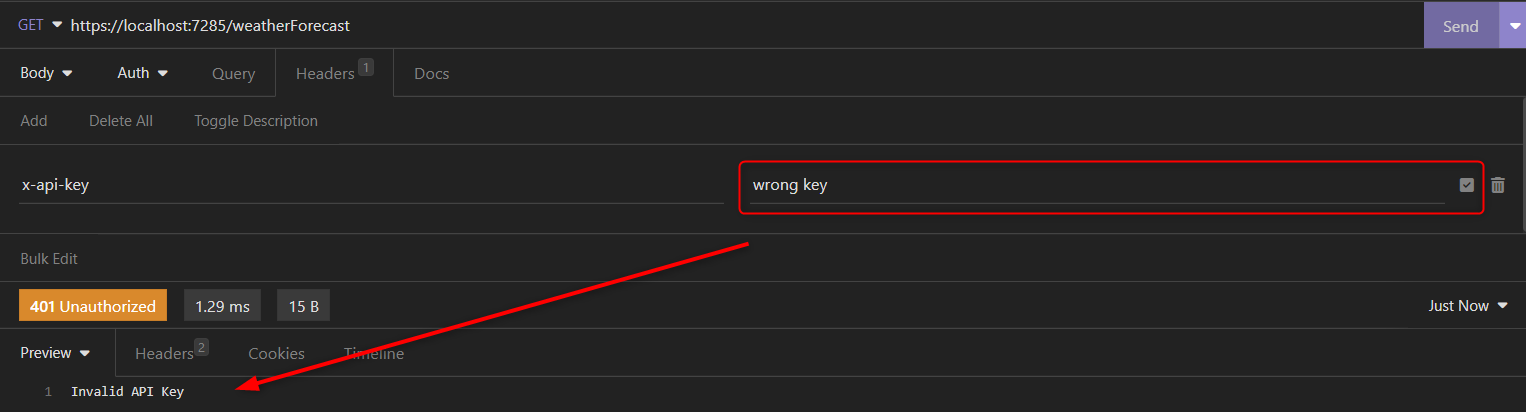
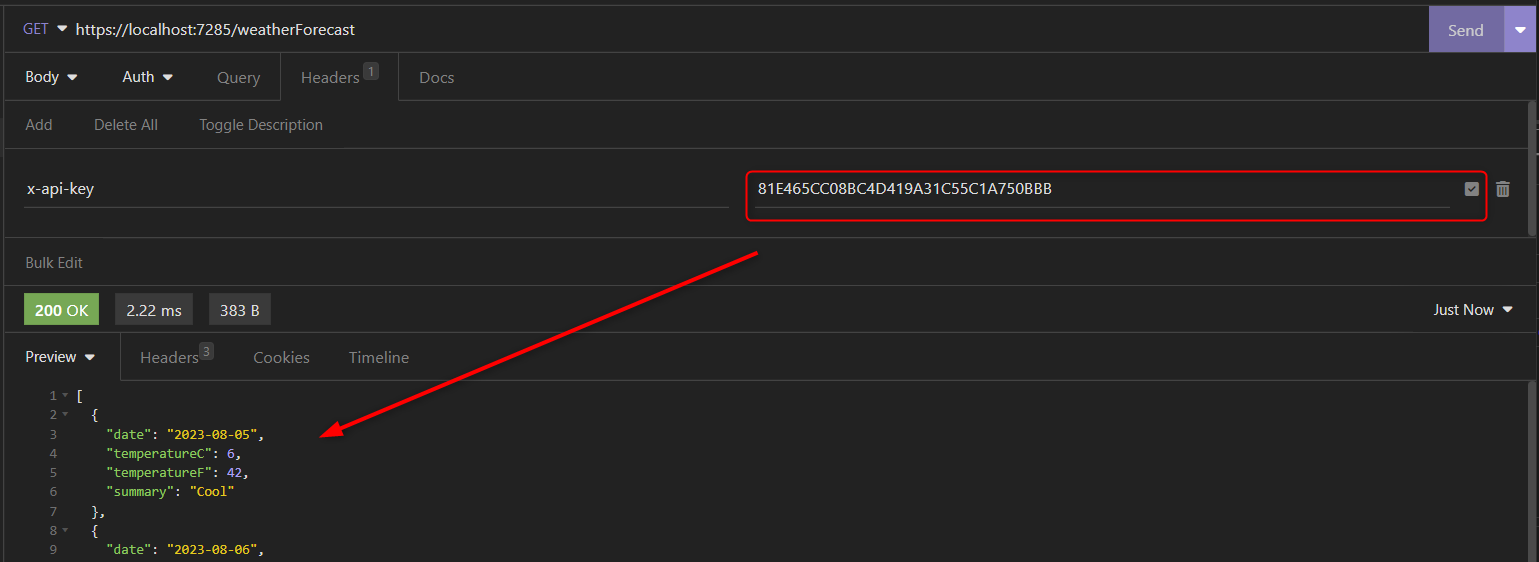
Demonstration
Call without any header:
Call with wrong header:
Call with correct header:
API key and filter
As an alternative to the middleware you can use a filter. The filter could also check every request, just like the middleware, or just check the endpoint its applied to.
Note: This applies to full API controllers, not to minimal APIs. These are described further below …
Implement IAsyncAuthorizationFilter for async operations:
1
2
3
4
5
6
7
8
9
10
11
using Microsoft.AspNetCore.Mvc.Filters;

namespace RestApiKeyAuthEDU.Authentication;

public class ApiKeyAuthFilter : IAsyncAuthorizationFilter
{
    public Task OnAuthorizationAsync(AuthorizationFilterContext context)
    {
        // ...
    }
}
For non async operations:
1
2
3
4
5
6
7
8
9
10
11
12
13
14
15
16
17
18
19
20
21
22
23
24
25
26
27
28
29
30
31
32
33
34
using Microsoft.AspNetCore.Mvc;
using Microsoft.AspNetCore.Mvc.Filters;

namespace RestApiKeyAuthEDU.Authentication;

public class ApiKeyAuthFilter : IAuthorizationFilter
{
    private readonly IConfiguration _configuration;

    public ApiKeyAuthFilter(IConfiguration configuration)
    {
        _configuration = configuration;
    }

    public void OnAuthorization(AuthorizationFilterContext context)
    {
        if (!context.HttpContext.Request.Headers.TryGetValue(AuthConstants.ApiKeyHeaderName, out var extractedApiKey))
        {
            context.Result = new UnauthorizedObjectResult(AuthConstants.ApiKeyMissing);
            return;
        }

        var apiKey = _configuration.GetValue<string>(AuthConstants.ApiKeySectionName);
        if (!apiKey.Equals(extractedApiKey))
        {
            context.Result = new UnauthorizedObjectResult(AuthConstants.ApiKeyInvalid);
            return;
        }

        // The filter returns and end the call if key auth fails or just continues.
        // Call for next is not needed here.

    }
}
The filter accesses the HttpContext via context.HttpContext to get the header and the key. It doesn’t need to call a next, like the middleware does.
Activate the filter for every request of the API in Program.cs:
1
2
3
4
5
6
7
8
9
// ...
var builder = WebApplication.CreateBuilder(args);

// Controller without any custom filters
//builder.Services.AddControllers();

// Controller with added filter for EVERY controller
builder.Services.AddControllers(x => x.Filters.Add<ApiKeyAuthFilter>());
// ...
Alternatively register the scoped filter for specific controllers or endpoints in Program.cs:
1
2
3
4
5
6
7
8
// ...
builder.Services.AddSwaggerGen();

// Register the AuthKeyFilter for single controllers
builder.Services.AddScoped<ApiKeyAuthFilter>();

var app = builder.Build();
// ...
Now you can add the filter on whole controllers beneath the [ApiController] attribute, or on specific endpoints of the controller e.g. beneath the [HttpGet("Weather")] attribute with:
1
2
3
4
5
6
[HttpGet("Weather")]
[ServiceFilter(typeof(ApiKeyAuthFilter))]
public IEnumerable<WeatherForecast> Get()
{
    // ...
}
Minimal API Filter
The above approach of filtering is not applied to minimal APIs. But there is an alternative approach for them as well.
I added a minimal API endpoint in the Program.cs class to show this:
1
2
3
4
5
6
7
8
9
10
11
12
13
14
15
16
app.MapControllers();

            // Example for filtering with minimal API
            app.Map("Weathermini", () =>
            {
                return Enumerable.Range(1, 5).Select(index => new WeatherForecast
                {
                    Date = DateOnly.FromDateTime(DateTime.Now.AddDays(index)),
                    TemperatureC = Random.Shared.Next(-20, 55),
                    Summary = WeatherForecastController.Summaries[Random.Shared.Next(WeatherForecastController.Summaries.Length)]
                })
                .ToArray();
            })
                .AddEndpointFilter<ApiKeyEndpointFilter>(); // This adds the filtering for this endpoint

            app.Run();
As youn can see the filtering is already added. We have to implement that now with the class ApiKeyEndpointFilter:
1
2
3
4
5
6
7
8
9
10
11
12
13
14
15
16
17
18
19
20
21
22
23
24
25
26
27
28
namespace RestApiKeyAuthEDU.Authentication;

public class ApiKeyEndpointFilter : IEndpointFilter
{
    private readonly IConfiguration _configuration;

    public ApiKeyEndpointFilter(IConfiguration configuration)
    {
        _configuration = configuration;
    }

    public async ValueTask<object?> InvokeAsync(EndpointFilterInvocationContext context, EndpointFilterDelegate next)
    {
        if (!context.HttpContext.Request.Headers.TryGetValue(AuthConstants.ApiKeyHeaderName, out var extractedApiKey))
        {
            return new UnauthorizedHttpObjectResult(AuthConstants.ApiKeyMissing);
        }

        // check if the transmitted API key matches the configured one
        var apiKey = _configuration.GetValue<string>(AuthConstants.ApiKeySectionName);
        if (!apiKey.Equals(extractedApiKey))
        {
            return new UnauthorizedHttpObjectResult(AuthConstants.ApiKeyInvalid);
        }

        return await next(context);
    }
}
This class uses some special return type UnauthorizedHttpObjectResult that is then able to return messages, like the other filtering approaches:
1
2
3
4
5
6
7
8
9
10
11
12
13
14
15
16
17
18
19
20
21
22
23
24
25
26
27
28
29
30
31
32
33
namespace RestApiKeyAuthEDU.Authentication;

public sealed class UnauthorizedHttpObjectResult : IResult, IStatusCodeHttpResult
{
    private readonly object _body;

    public UnauthorizedHttpObjectResult(object body)
    {
        _body = body;
    }

    /// <summary>
    /// Gets the HTTP status code: <see cref="StatusCodes.Status401Unauthorized" />
    /// </summary>
    public int StatusCode => StatusCodes.Status401Unauthorized;

    int? IStatusCodeHttpResult.StatusCode => StatusCode;

    /// <inheritdoc />
    public async Task ExecuteAsync(HttpContext httpContext)
    {
        ArgumentNullException.ThrowIfNull(httpContext, nameof(httpContext));

        httpContext.Response.StatusCode = StatusCode;
        if (_body is string s)
        {
            await httpContext.Response.WriteAsync(s);
            return;
        }

        await httpContext.Response.WriteAsJsonAsync(_body);
    }
}
If the return is of type stringit will be returned, but any other object will be serialized and be returned as json string.
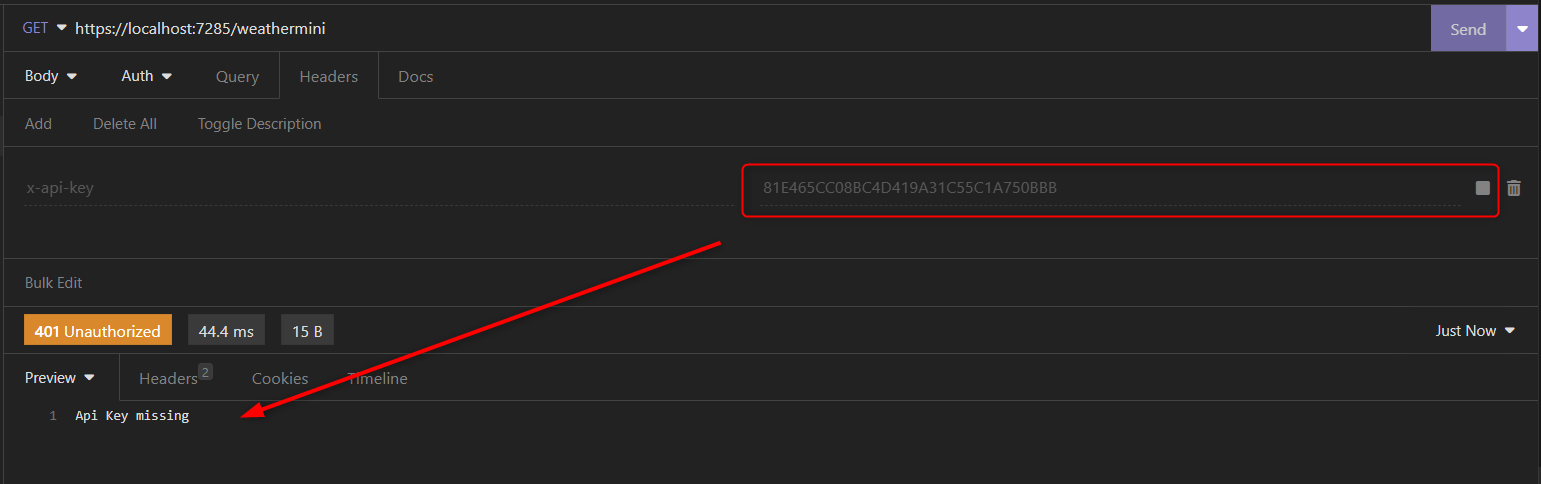
Demonstration
Swagger OpenApi Support
Swagger cannot work with the API Key in the default loadout. But we can implement some Swagger configuration in the program.csclass by changing the builder.Services.AddSwaggerGen(); line to the following:
1
2
3
4
5
6
7
8
9
10
11
12
13
14
15
16
17
18
19
20
21
22
23
24
25
26
27
28
29
// Add API Key Swagger support
builder.Services.AddSwaggerGen(c =>
{
    c.AddSecurityDefinition("ApiKey", new OpenApiSecurityScheme
    {
        Description = "The API Key to access the API",
        Type = SecuritySchemeType.ApiKey,
        Name = AuthConstants.ApiKeyHeaderName,
        In = ParameterLocation.Header,
        Scheme = "ApiKeyScheme"
    });

    var scheme = new OpenApiSecurityScheme
    {
        Reference = new OpenApiReference
        {
            Type = ReferenceType.SecurityScheme,
            Id = "ApiKey"
        },
        In = ParameterLocation.Header
    };

    var requirement = new OpenApiSecurityRequirement
    {
        {scheme, new List<string>() }
    };

    c.AddSecurityRequirement(requirement);
});
The code defines a scheme to be required in the requirement object and applies this to the Swagger generator.
The Swagger UI then changes and displays a new Button:

With clicking it, the API Key can be save and we then can use the authenticated Swagger UI to call the endpoints:
