SQLite Entity Framework Demo
Intro
SQLite is a very useful way to have a local small DB system to cache or store relative data for your application. You get a fully functioning SQL DB System to be used by a DB ORM tool like Dapper or EF, without having a heavy system to install or to run besides your application. The SQLite DB lies as a single file besides your application and therefore is super portable as well.
A good way to work and create SQLite DB is the tool DB Browser for SQLite.
Creating a Demo C#
This DEMO project uses a Console Application with Microsoft.Extensions.Configuration, Microsoft.Extensions.DependencyInjection, Microsoft.Extensions.Hosting and the EF packages. The ConfigurationBuildergets its data from the appsettings.jsonfile. Serilog gets wired up with this as well. Then the Host is set up with the DataContext, its connectionString and the Dependency Injection registrations:
1
2
3
4
5
6
7
8
9
10
11
12
13
14
15
16
17
18
19
20
21
22
23
24
// Build a configuration from appsettings.json files and store them in the var
var configuration = new ConfigurationBuilder()
    .SetBasePath(Directory.GetCurrentDirectory())
    .AddJsonFile("appsettings.json")
    .Build();

// Create logger with above configuration
Log.Logger = new LoggerConfiguration()
    .ReadFrom.Configuration(configuration)
    .CreateLogger();

// Build host with Dependency Injection and Serilog as logger
var host = Host.CreateDefaultBuilder()
    .ConfigureServices((context, services) =>
    {
        // EF add DB Context with options for DB connection and ConnectionString from config here ...
        services.AddDbContext<DataContext>(options =>
            options.UseSqlite(configuration.GetConnectionString("Default")));

        // define DI here ...
        services.AddTransient<IPersonProcessor, PersonProcessor>();
    })
    .UseSerilog() // <- Serilog
    .Build();
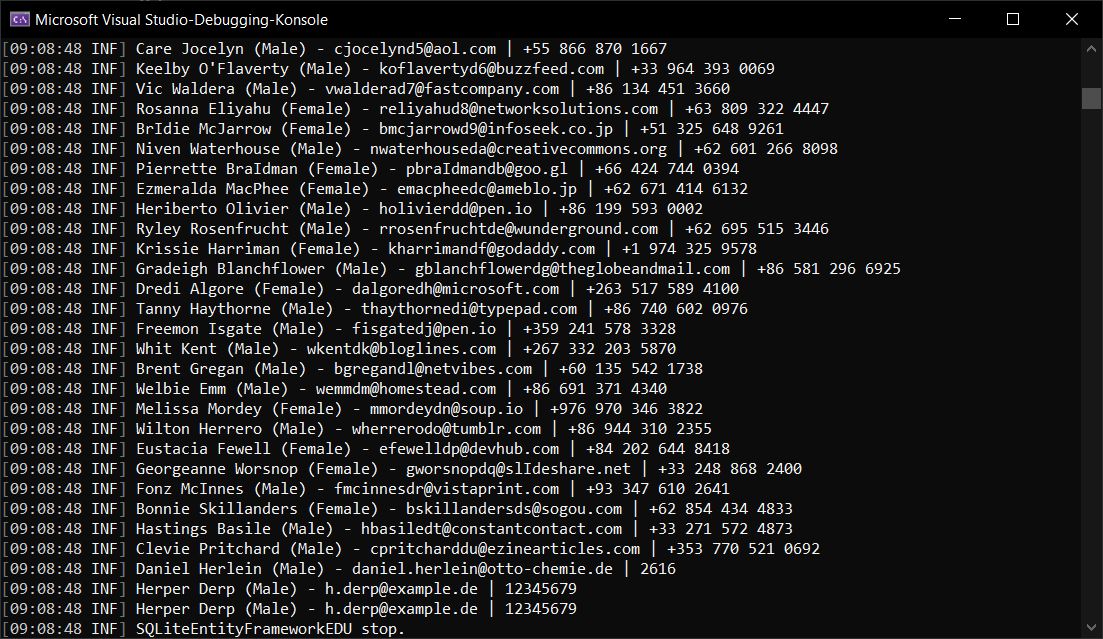
The DEMO then uses the Program.cs to test some DB calls and logs the output to console.
Entity Framework
We use the Code-First approach of EF to build the DB through EF based on our Models. we need to install some packages to use EF and SQLite in the project:
Microsoft.EntityFrameworkCoreMicrosoft.EntityFrameworkCore.DesignMicrosoft.EntityFrameworkCore.ToolsMicrosoft.EntityFrameworkCore.Sqlite
Additionally, we need to once install the dotnet tools for ef and the CLI with the command dotnet tool install --global dotnet-ef in the Package Manager Console:
](/assets/images/articles/sqlite-ef-demo/PackageManagerConsoleInstallEFTools.png)
Model
To use the Code-First approach, we need to create a Model to be used of EF to create the tables upon. The DEMO just uses the model Person with some properties to be translated as column names. EF recognizes the Id property for instance and creates an Id column with a Primary Key.
ConnectionString and DataContext
The Connection string is defined in the appsettings.json:
1
2
3
4
5
6
7
8
9
10
11
12
13
14
15
16
17
18
{
  "ConnectionStrings": {
    "Default": "Data Source=.\\DataBase\\DemoDB.db;"
  },
  "Serilog": {
    "Using": [ "Serilog.Sinks.Console" ],
    "WriteTo": [
      { "Name": "Console" }
    ],
    "MinimumLevel": {
      "Default": "Information",
      "Override": {
        "Microsoft": "Warning",
        "System": "Warning"
      }
    }
  }
}
The SQLite ConnectionString is simply the path to the file as Data Source. Now we need the DataContext class to open the connections and to handle all DB stuff from our C# code:
1
2
3
4
5
6
7
8
9
10
11
namespace SQLiteEntityFrameworkEDU.Data
{
    public class DataContext : DbContext
    {
        public DataContext(DbContextOptions<DataContext> options) : base(options)
        {
        }

        public DbSet<Person> Persons { get; set; }
    }
}
It derives from the DbContext and passes the options to its base constructor.
With the public DbSet<Person> Persons { get; set; } property EF knows about the Person model and to create migrations for it.
Migration
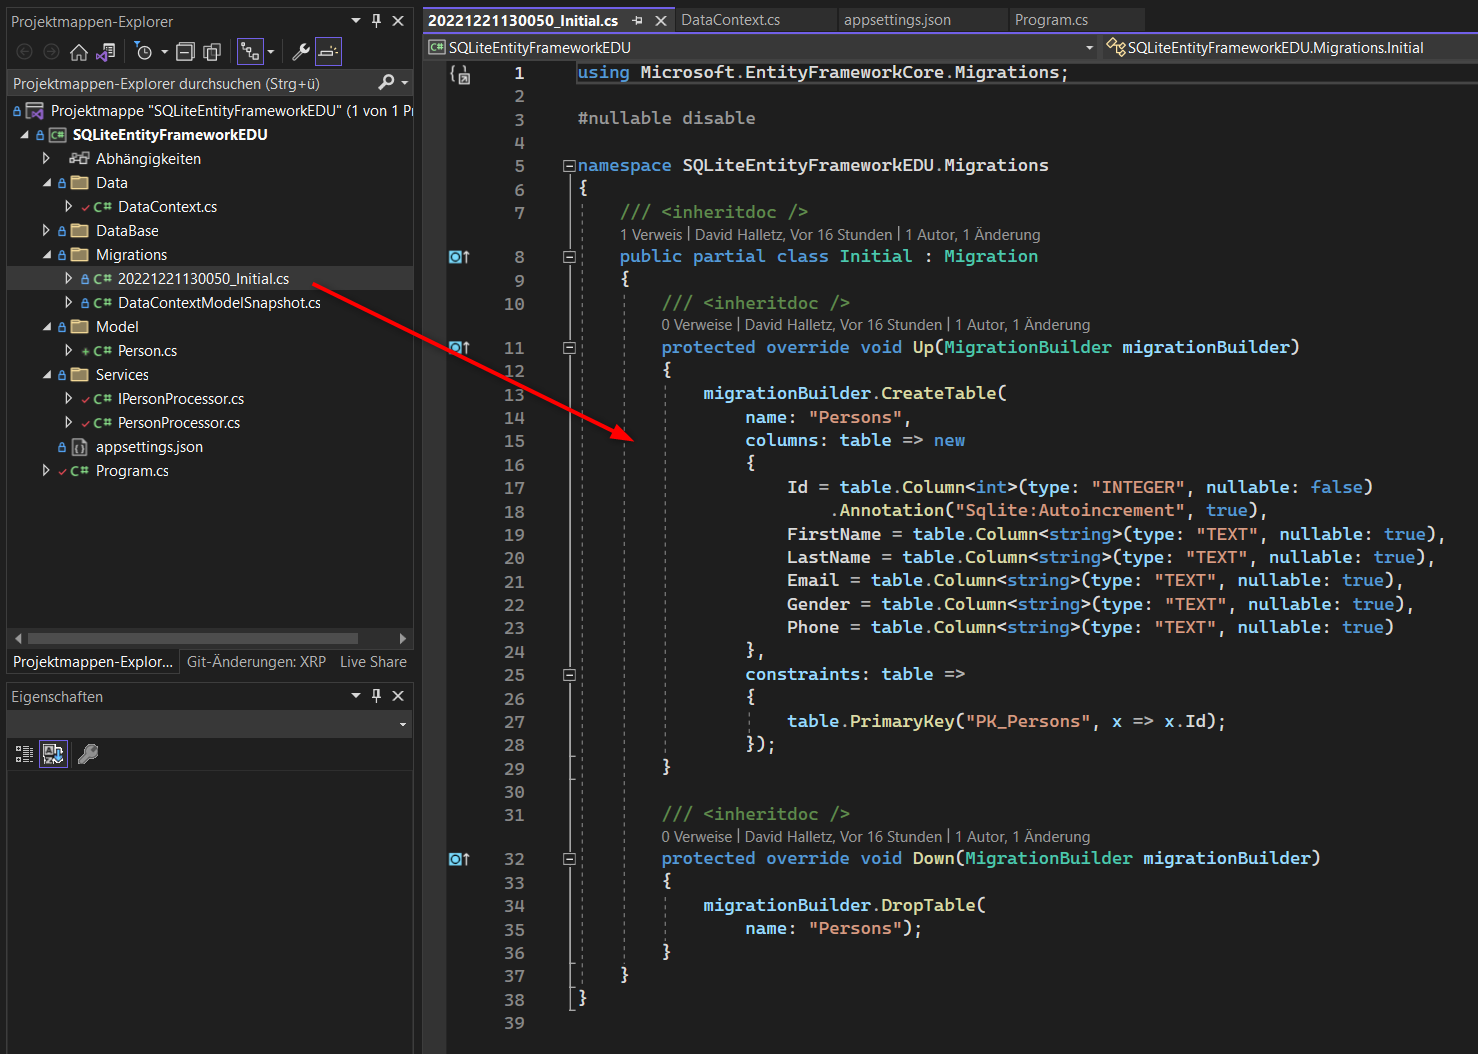
EF uses so called migrations to translate the models to tables. It can generate the migration by itself. You need to call a command on the Package Manager Console for this: dotnet ef migrations add <name>. The Name is used to name the C# migration class code and to track the changes you do for each migration. The call generates a file in a migrations folder in the project:
](/assets/images/articles/sqlite-ef-demo/migration.png)
As you can see, this code shows how EF will create the table in the DB.
Now you need another command to activate the migration: dotnet ef database update
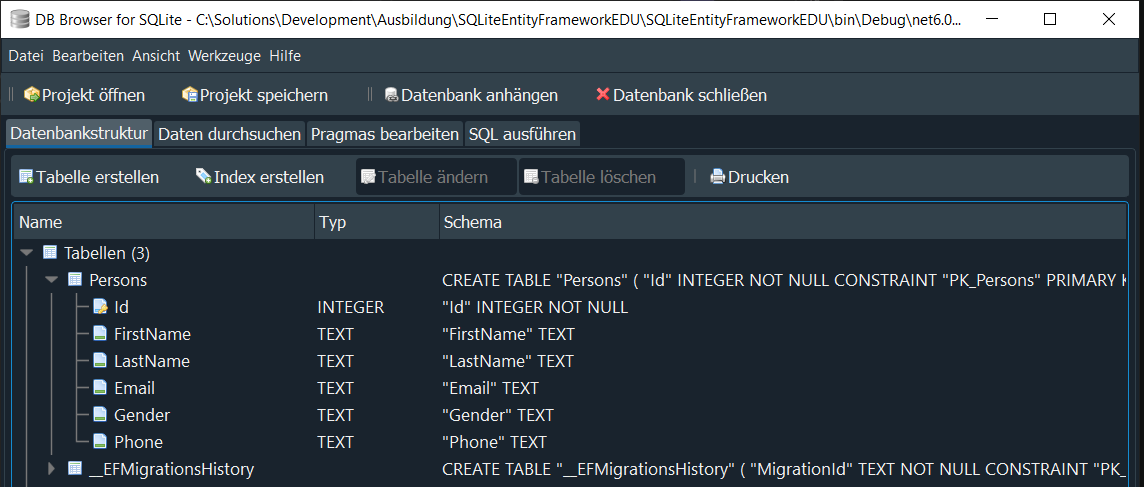
This writes all changes to the DB and creates or updates the tables.
You can check the changes with opening the db file with the SQLite browser tool:
](/assets/images/articles/sqlite-ef-demo/migration-SQLiteBrowser.png)
Accessing the DB
With the DataContext we have the layer to access the DB. We now need to define queries in Methods to query the data. I have created a PersonProcessor class with DI to get the instantiated DataContext and a logger. The class gets some Methods for querying, like the GetAllPersons() method:
public class PersonProcessor : IPersonProcessor
{
    private readonly DataContext _context;
    private readonly ILogger<PersonProcessor> _logger;

    public PersonProcessor(DataContext context, ILogger<PersonProcessor> logger)
    {
        _context = context;
        _logger = logger ?? NullLogger<PersonProcessor>.Instance;
    }

    public async Task<List<Person>> GetAllPersons()
    {
        _logger.LogInformation("Find all Persons from DB ...");
        return await _context.Persons.ToListAsync();
    }

    public async Task<Person> GetPersonById(int id)
    {
        _logger.LogInformation("Find person by id: {Id} ...", id);
        return await _context.Persons.FindAsync(id);
    }

    public async Task AddPerson(Person person)
    {
        _logger.LogInformation("Add Person '{Person}' to DB ...", person.FullName);
        _context.Persons.Add(person);
        await _context.SaveChangesAsync();
    }

    public async Task DeletePerson(Person person)
    {
        _logger.LogInformation("Delete Person '{Person}' from DB ...", person.FullName);
        _context.Persons.Remove(person);
        await _context.SaveChangesAsync();
    }
}
These are some simple examples to access the data, which can now be called from anywhere in the application with an instance of the PersonProcessor.
Populate the DB with some test data: You can generate some test data at Mockeroo and get an insert SQL to fill your table with.
See an exapmle in Program.cs:
1
2
3
4
5
6
7
8
9
10
11
12
13
14
15
16
17
18
19
20
21
22
23
24
25
private static async Task Main(string[] args)
{
    // ...
    var personProcessor = host.Services.GetService<IPersonProcessor>()!;

    var newPerson = new Person
    {
        FirstName = "Herper",
        LastName = "Derp",
        Email = "h.derp@example.de",
        Phone = "12345679",
        Gender = "Male"
    };

    await personProcessor.AddPerson(newPerson);

    await LogAllPersons(personProcessor);
    // ...
}

private static async Task LogAllPersons(IPersonProcessor personProcessor)
{
    var personList = await personProcessor.GetAllPersons();
    personList.ForEach(e => { Log.Information(e.Info); });
}
](/assets/images/articles/sqlite-ef-demo/example-output.png)