Create an Outlook VSTO AddIn
This article describes the creation of a basic Outlook VSTO AddIn.
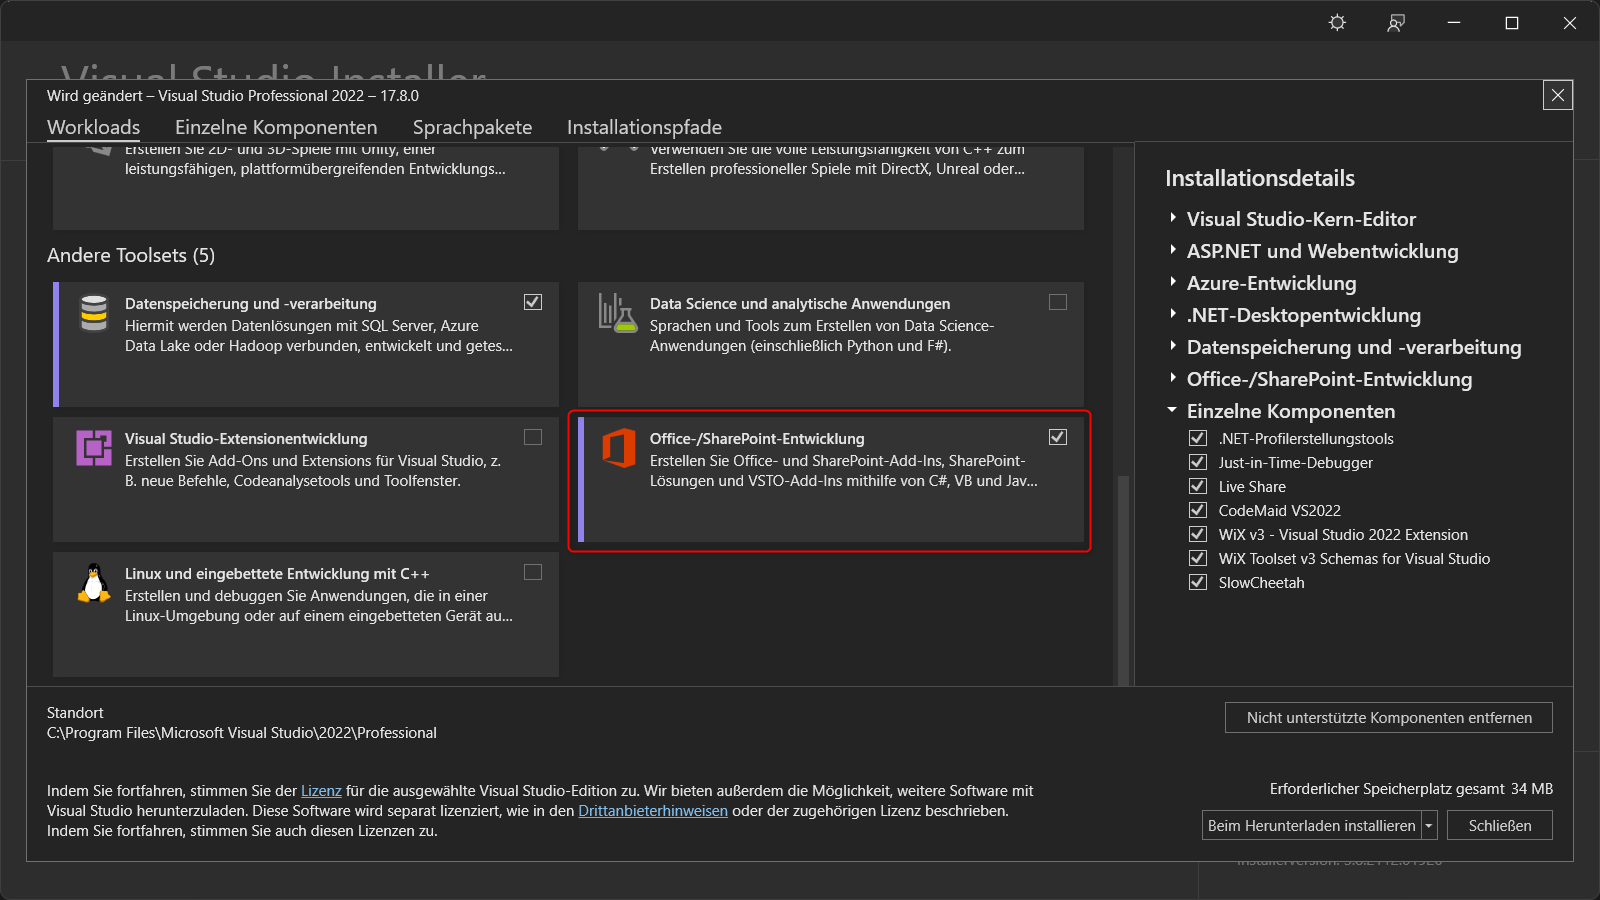
To create VSTO Office AddIns you need to install the Visual Studio Tools for that via the VS Installer:
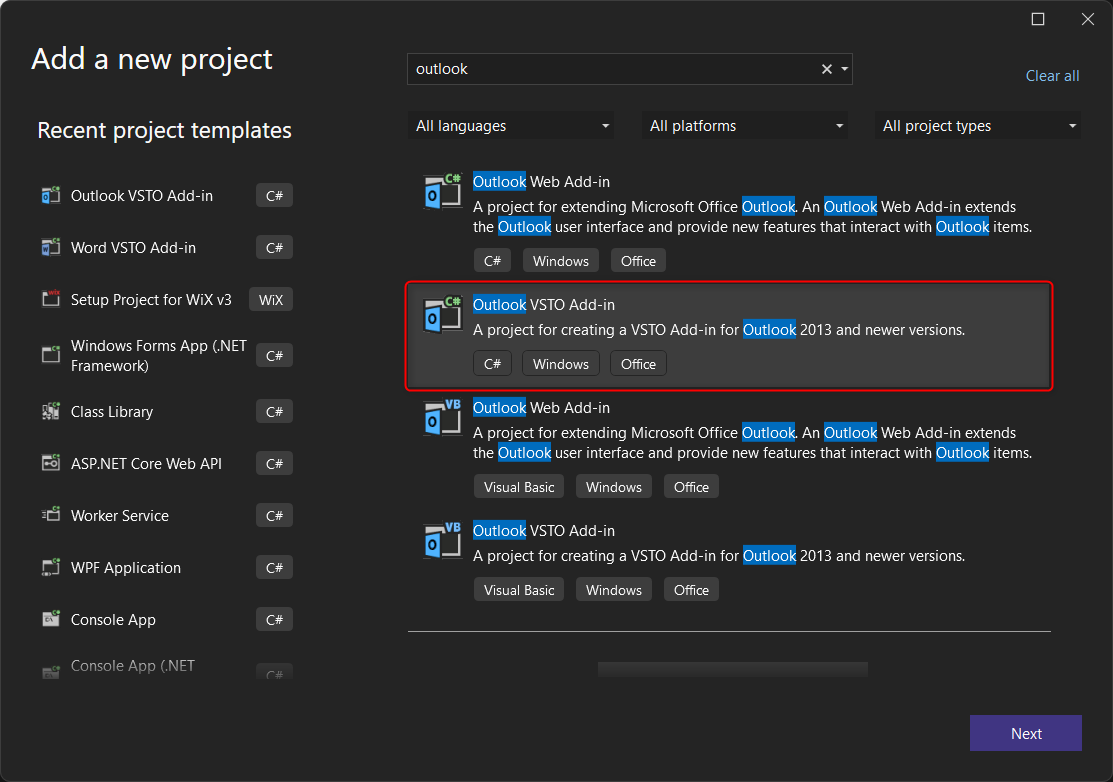
Then create a new project with the type Outlook VSTO Add-In:
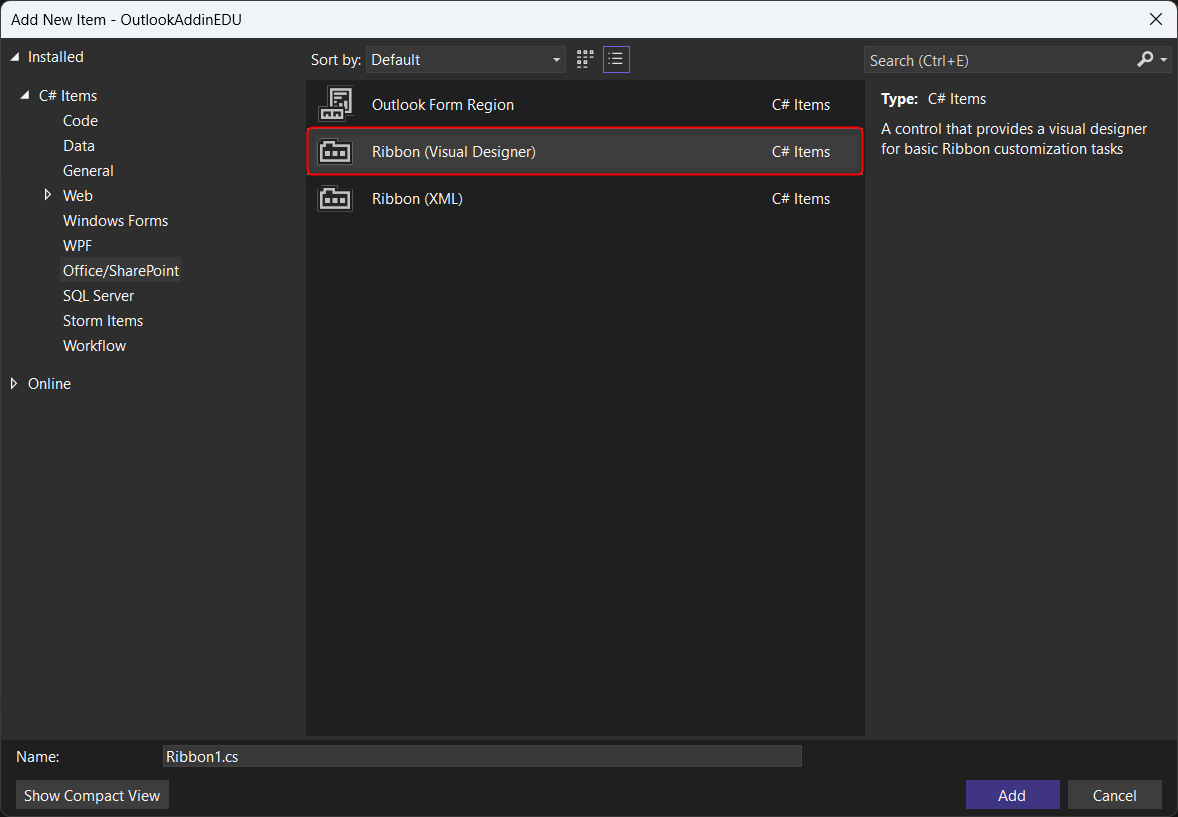
Now add a new item and select the Ribbon (Visual Designer) in the Office/SharePoint group:
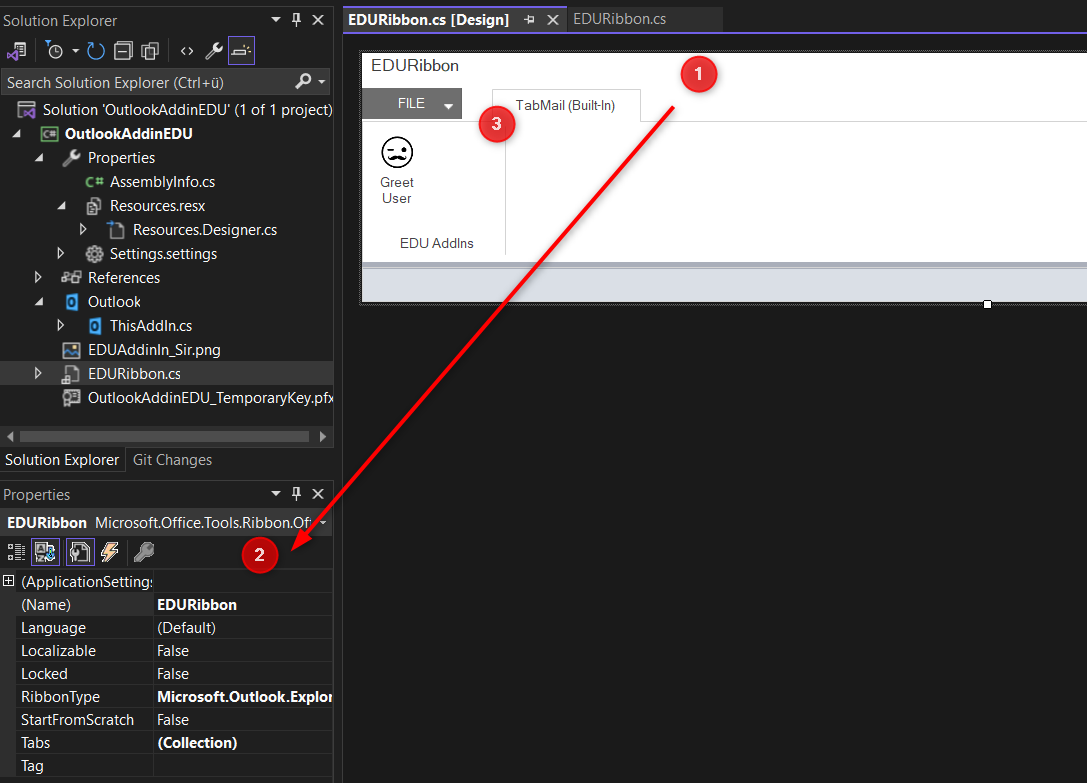
If you want your AddIn buttons to be shown in the main Outlook window ribbon, you have to set some properties. Click on the designer windows Background and set the RibbonType property to Microsoft.Outlook.Explorer. Then click on the tab to set the Name property to TabDefault and the Label property to TabMail to ensure your AddIn Group and Buttons get displayed:
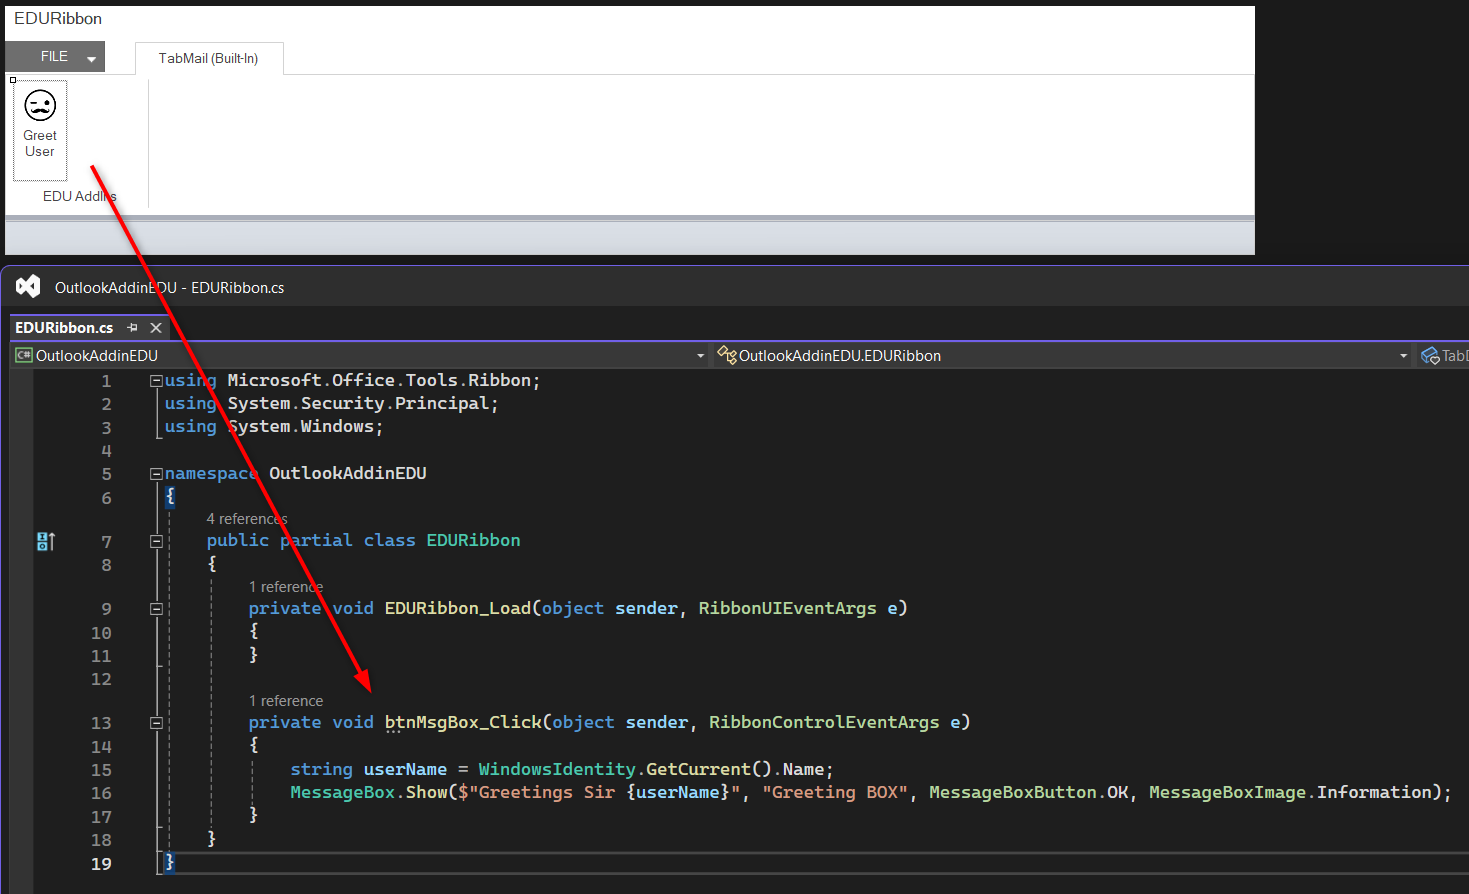
Now you can configure all the wanted functionality and the design. We add a button in a group for this example and return a Greeting String in a MessageBox:
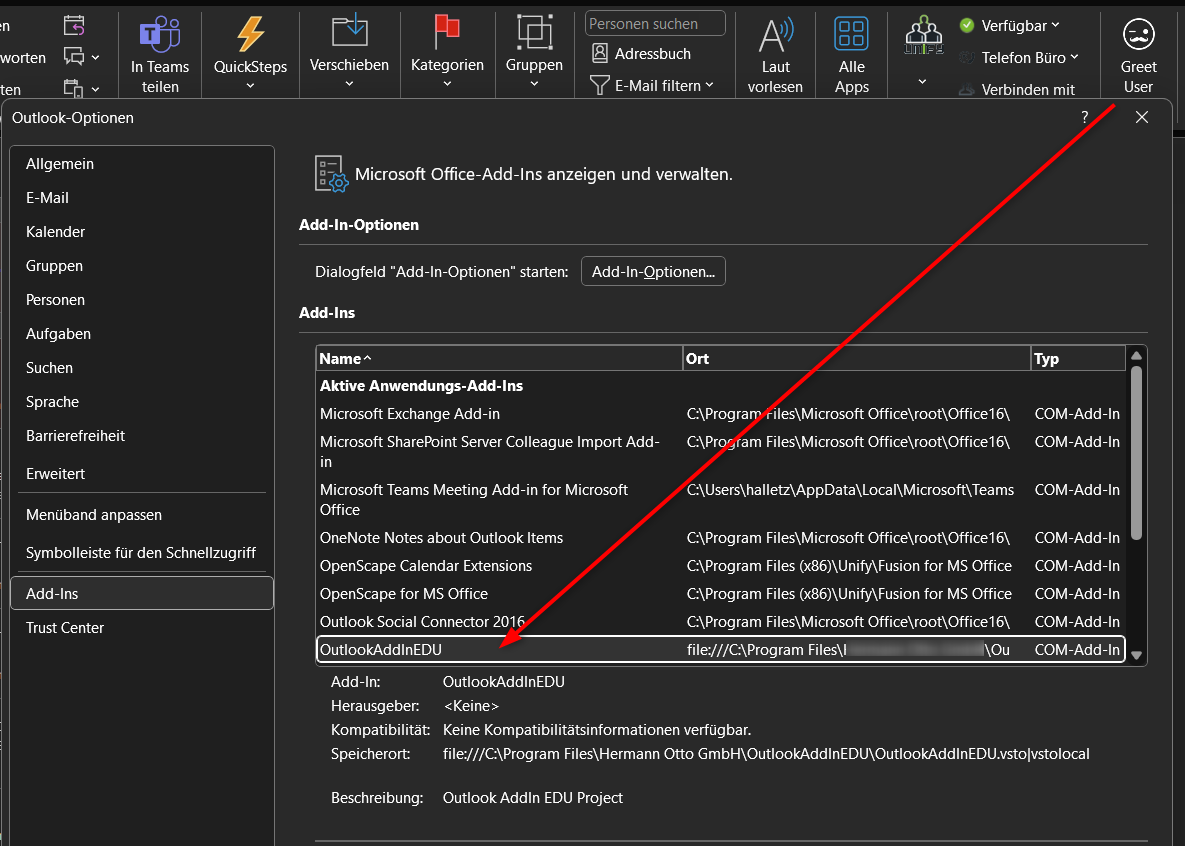
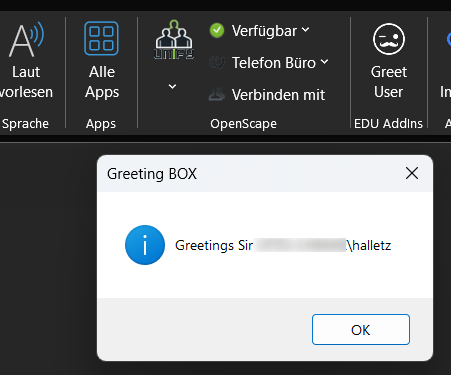
Debugging this code will automatically start Outlook with the AddIn and now we can test if it is activated and is shown in the ribbon bar:
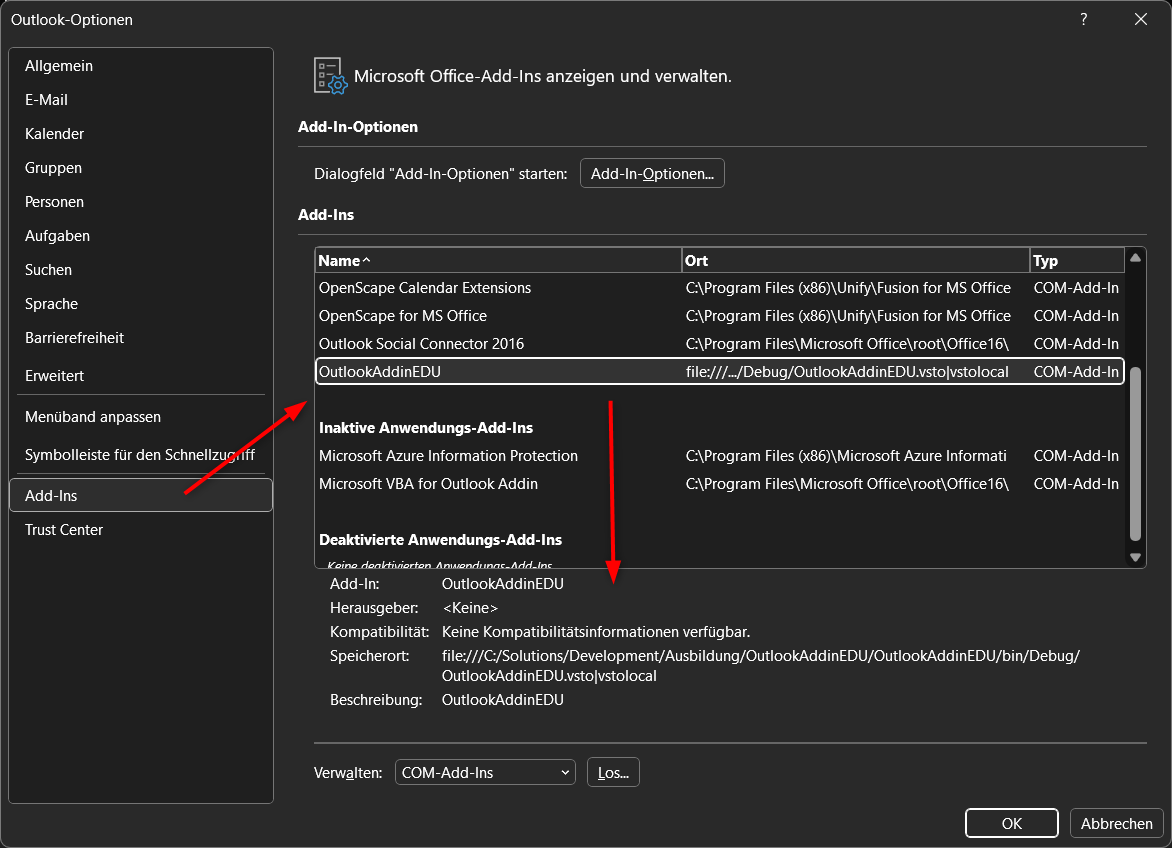
The Options/AddIns Dialog also shows that the AddIn is active and where it loaded from:
Some more Details
VSTO AddIns are getting outdated and are not supported by the .NET Core, .NET5+ any more. The project has to be a .NET Framework 4.8 project. Another Problem is that Microsoft changes its Outlook Client to run as web based software, which doesn’t support VSTO AddIns any more. The new AddIns have to be web based Outlook AddIns and have a completely new way to be developed.
Deployment / Installation
VSTO AddIns produce some DLL files, a manifest file and a VSTO file. These files have to be deployed on a target machine via installer or web share. Then you need some Registry entries for Outlook to know where your AddIn is located and to display its data correctly.
Place the following Registry entries at these locations for 32 and 64 bit (64 bit is recommended to use both locations): HKLM\Software\Microsoft\Office\Word\Addins\MySuperAddOn
HKLM\Software\WOW6432Node\Microsoft\Office\Word\Addins\MySuperAddOn
| Entry | Type | Value |
|---|---|---|
| Description | REG_SZ | Required. A brief description of the VSTO AddIn. This description is displayed when the user selects the VSTO AddIn in the Add-Ins pane of the Options dialog box in the Microsoft Office application. |
| FriendlyName | REG_SZ | Required. A descriptive name of the VSTO AddIn that is displayed in the COM Add-Ins dialog box in the Microsoft Office application. The default value is the VSTO AddIn ID. |
| LoadBehavior | REG_DWORD | Required. A value that specifies when the application attempts to load the VSTO AddIn and the current state of the VSTO AddIn (loaded or unloaded). By default, this entry is set to 3, which specifies that the VSTO AddIn is loaded at startup. For more information, see LoadBehavior values. Note: If a user disables the VSTO AddIn, that action modifies LoadBehavior value in the HKEY_CURRENT_USER registry hive. For each user, the value of the LoadBehavior value in the HKEY_CURRENT_USER hive overrides the default LoadBehavior defined in the HKEY_LOCAL_MACHINE hive. |
| Manifest | REG_SZ | Required. The full path of the deployment manifest for the VSTO AddIn. The path can be a location on the local computer, a network share (UNC), or a Web server (HTTP). If you use Windows Installer to deploy the solution, you must add the prefix file:/// to the manifest path. You must also append the string \|vstolocal (that is, the pipe character \| followed by vstolocal) to the end of this path. This ensures that your solution is loaded from the installation folder, rather than the ClickOnce cache. For more information, see Deploy an Office solution by using Windows Installer. Note: When you build a VSTO AddIn on the development computer, Visual Studio automatically appends the pipe \| |
Check te official documentation for further details: MS VSTO AddIns Documentation
WiX Setup
You can use the WiX tool set for installing the AddIn. It is capable to do the necessary actions of copying the files to a specific install directory and write the Registry entries for the Outlook recognition.
Here is an example of a WiX V3 project WSX file:
1
2
3
4
5
6
7
8
9
10
11
12
13
14
15
16
17
18
19
20
21
22
23
24
25
26
27
28
29
30
31
32
33
34
35
36
37
38
39
40
41
42
43
44
45
46
47
48
49
50
51
52
53
54
55
56
57
58
59
60
61
62
63
64
65
66
67
68
69
70
71
72
73
74
75
76
77
78
79
<?xml version="1.0" encoding="UTF-8"?>
<Wix xmlns="http://schemas.microsoft.com/wix/2006/wi">
	<!-- define dynamic variables here -->
	<?define ProductName="OutlookAddInEDU" ?>
	<?define ProductManufacturer="YOUR COMPANY" ?>
	<?define PackageDescription="Outlook AddIn EDU Project" ?>
	<?define UpgradeCodeGUID="{NEW_GUID}" ?>
	<?define ApplicationShortcutGUID="{NEW_GUID}" ?>
	<?define ProductVersion="!(bind.FileVersion.OutlookAddInDll)" ?>
	<?define ProductTargetDir=$(var.OutlookAddInEDU.TargetDir) ?>
	<?define ProductHelpLink=YOUR_URL ?>

	<!-- * GUID for Product and Package are ok for Major upgrades, only UpgradeCode GUID has to stay for the specific ENV -->
	<Product Id="*"
			 Name="$(var.ProductName)"
			 Language="1033"
			 Version="$(var.ProductVersion)"
			 Manufacturer="$(var.ProductManufacturer)"
			 UpgradeCode="$(var.UpgradeCodeGUID)">
		<Package Id="*"
				 Description="$(var.PackageDescription)"
				 InstallerVersion="200"
				 Compressed="yes"
				 InstallScope="perMachine"
				 Platform="x64" />

		<!-- trigger major upgrade https://wixtoolset.org/docs/v3/howtos/updates/major_upgrade/ with earlier schedule -->
		<MajorUpgrade Schedule="afterInstallInitialize"
					  DowngradeErrorMessage="A newer version of [ProductName] is already installed." />

		<!-- Pack all files, including the cab archive into the MSI -->
		<MediaTemplate EmbedCab="yes" />

		<!-- List of features with their components to be installed -->
		<Feature Id="ProductFeature" Title="OutlookAddInEDU.Setup" Level="1">
			<ComponentGroupRef Id="OutlookAddInComponents" />
		</Feature>

		<!-- Provide information links to be displayed in "Programs and Features" -->
		<Property Id="ARPURLINFOABOUT"  Value="$(var.ProductHelpLink)" />
	</Product>

	<!-- Directories -->
	<Fragment>
		<Directory Id="TARGETDIR" Name="SourceDir">
			<!-- Program Files Folder -->
			<!-- use this ID and Package attribute Platform="x64" to use the 64 bit folder instead of (x86)  -->
			<!-- https://stackoverflow.com/questions/5479790/wix-how-to-override-c-program-files-x86-on-x64-machine-in-wixui-advanced-s -->
			<Directory Id="ProgramFiles64Folder">
				<Directory Id="MANUFACTURERFOLDER" Name="!(bind.property.Manufacturer)">
					<Directory Id="INSTALLFOLDER" Name="!(bind.property.ProductName)" />
				</Directory>
			</Directory>
		</Directory>
	</Fragment>

	<!-- Files and Registry Entries for Outlook Plugin Deployment -->
	<Fragment>
		<ComponentGroup Id="OutlookAddInComponents" Directory="INSTALLFOLDER">
			<Component Id="OutlookAddInComponent" Guid="{04B97021-0CF9-4DBF-8A05-BF64D3C704A0}">
				<File Id="OutlookAddInDll" Source="$(var.ProductTargetDir)OutlookAddInEDU.dll" />
				<File Id="OutlookAddInPdb" Source="$(var.ProductTargetDir)OutlookAddInEDU.pdb" />
				<File Id="OutlookAddInVsto" Source="$(var.ProductTargetDir)OutlookAddInEDU.vsto" />
				<File Id="OutlookAddInManifest" Source="$(var.ProductTargetDir)OutlookAddInEDU.dll.manifest" />
				<File Id="MsOfficeCommonUtilitiesDll" Source="$(var.ProductTargetDir)Microsoft.Office.Tools.Common.v4.0.Utilities.dll" />
				<File Id="MsOfficeOutlookUtilitiesDll" Source="$(var.ProductTargetDir)Microsoft.Office.Tools.Outlook.v4.0.Utilities.dll" />

				<Registry Root="HKLM" Key="Software\Microsoft\Office\Outlook\Addins\$(var.ProductName)" Name="Description" Value="$(var.PackageDescription)" Type="string" />
				<Registry Root="HKLM" Key="Software\Microsoft\Office\Outlook\Addins\$(var.ProductName)" Name="FriendlyName" Value="$(var.ProductName)" Type="string" />
				<Registry Root="HKLM" Key="Software\Microsoft\Office\Outlook\Addins\$(var.ProductName)" Name="LoadBehavior" Value="3" Type="integer" />
				<Registry Root="HKLM" Key="Software\Microsoft\Office\Outlook\Addins\$(var.ProductName)" Name="Manifest" Value="file:///[INSTALLFOLDER]$(var.ProductName).vsto|vstolocal" Type="string" />
				<Registry Root="HKLM" Key="Software\WOW6432Node\Microsoft\Office\Outlook\Addins\$(var.ProductName)" Name="Description" Value="$(var.PackageDescription)" Type="string" />
				<Registry Root="HKLM" Key="Software\WOW6432Node\Microsoft\Office\Outlook\Addins\$(var.ProductName)" Name="FriendlyName" Value="$(var.ProductName)" Type="string" />
				<Registry Root="HKLM" Key="Software\WOW6432Node\Microsoft\Office\Outlook\Addins\$(var.ProductName)" Name="LoadBehavior" Value="3" Type="integer" />
				<Registry Root="HKLM" Key="Software\WOW6432Node\Microsoft\Office\Outlook\Addins\$(var.ProductName)" Name="Manifest" Value="file:///[INSTALLFOLDER]$(var.ProductName).vsto|vstolocal" Type="string" />
			</Component>
		</ComponentGroup>
	</Fragment>
</Wix>
You need to customize the default generated WiX Setup to be x64 compatible with some tweaks int he wixporj file:
1
2
3
4
5
6
7
8
9
10
11
12
13
14
15
<!-- Insert for x64-->
<PropertyGroup>
  <InstallerPlatform>x64</InstallerPlatform>
</PropertyGroup>
<!-- and -->
<PropertyGroup Condition=" '$(Configuration)|$(Platform)' == 'Debug|x64' ">
  <DefineConstants>Debug</DefineConstants>
  <OutputPath>bin\$(Configuration)\</OutputPath>
  <IntermediateOutputPath>obj\$(Configuration)\</IntermediateOutputPath>
</PropertyGroup>
  <PropertyGroup Condition=" '$(Configuration)|$(Platform)' == 'Release|x64' ">
  <OutputPath>bin\$(Configuration)\</OutputPath>
  <IntermediateOutputPath>obj\$(Configuration)\</IntermediateOutputPath>
  <SuppressPdbOutput>True</SuppressPdbOutput>
</PropertyGroup>
If you build this project with MS DevOps and Cloud Containers, your VSBuild task might need to get an additional property (msbuildArgs: '/p:RunWixToolsOutOfProc=true') for the WiX linker light.exe not to timeout in a deadlock. This is fixed in coming versions of WiX v3.14 or 4.0:
1
2
3
4
5
6
7
- task: VSBuild@1
  displayName: 'Build Solution'
  inputs:
    solution: '$(solution)'
    platform: '$(buildPlatform)'
    configuration: '$(buildConfiguration)'
    msbuildArgs: '/p:RunWixToolsOutOfProc=true'
Check the installation
After installing the MSI package you can check if the Registry keys are set, if the files are in the designated install directory and of course, if Outlook now loads with your AddIn: